|
|
Post by PinkFloyd on Jul 1, 2017 20:19:04 GMT
wow... that is kind of a daunting website. I wouldn't have a clue where to start and know what is good. I'll post some more detailed photo's of the pcb of the x-24k with components and the text on them. Maybe we can work out what to change. By the way my goal is to improve my system but also make the x series survive another 20 years. I like the system so much that I don't want to go back to large black box audio. I know RS inside out Nando..... not that daunting..... you just need to know what you're looking for  With the right caps / values you will not only help your system to survive a LOT MORE than the next 20 years, it will also sound a helluva lot better too!!. The PSU section of the X-24K...... I would deffo replace the 2 x 2200uF and 4 x 1000uF Jamicon 85C caps with 6 x 2200uF / 35V Panasonic FR caps. They will last for tens of years and the extra capacitance will reap sonic rewards too. The FR are rated at 10,000 hours @ 105C..... that means they will stay in spec for 10,000 hours in an ambient temperature of 105C..... that is their MAX rating! The X-24K won't get anywhere close to 40C so that means the 105C rated caps will remain in-spec for MANY MANY thousand hours....... 30 years at least!! The Panasonic FR also sound good, they have the classic Panasonic liquid / flowing house sound (similar to FM and FC) and with a 10,000hr rating @ 105C they will outlast you, for sure. The warmest part of the X-24K circuit will be around the regulators (REG1 / REG2) so 105C rated caps are your friend in these positions..... the 85C general purpose Jamicon caps are not ideal BUT, all credit to them, they have lasted a couple of decades in most of the X-Series amps so we must respect them for that. Best regards, Mike. |
|
|
|
Post by PinkFloyd on Jul 1, 2017 12:08:11 GMT
|
|
|
|
Post by PinkFloyd on Jun 29, 2017 20:57:28 GMT
Listening to some hardcore FUNK with official belted hat......... bass to die for!
|
|
|
|
Post by PinkFloyd on Jun 29, 2017 20:23:14 GMT
Fun times |
|
|
|
Post by PinkFloyd on Jun 29, 2017 20:14:57 GMT
|
|
|
|
Post by PinkFloyd on Jun 29, 2017 20:02:55 GMT
|
|
|
|
Post by PinkFloyd on Jun 28, 2017 20:57:22 GMT
Ed Sheeran?
WANKER!!!
|
|
|
|
Post by PinkFloyd on Jun 28, 2017 20:26:59 GMT
The entire gig was PURE class IMO.
|
|
|
|
Post by PinkFloyd on Jun 28, 2017 20:11:55 GMT
Top class!
|
|
|
|
Post by PinkFloyd on Jun 28, 2017 20:09:29 GMT
I have made a photo to show that there is some room to work with. 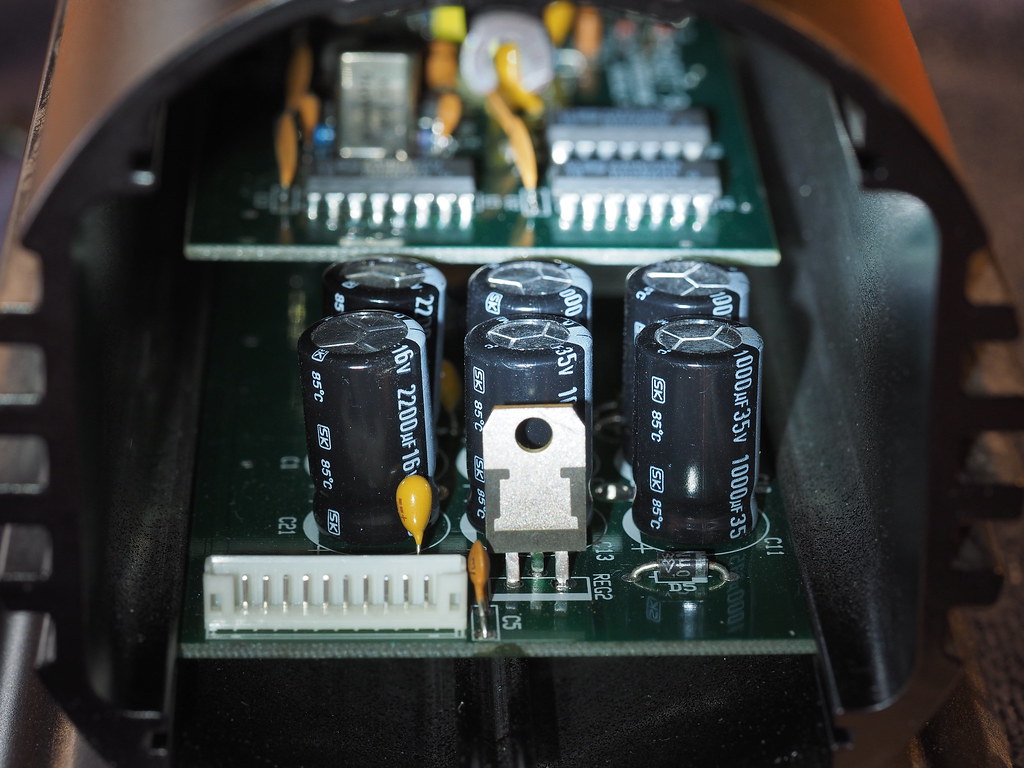 Height to work with but not much width Nando. Those are Jamicon SK series general purpose 85C caps and well due a "removal and recap" with something more sonically appropriate. The 16V / 2200uF will be approx 21mm H x 12mm W and the 35V / 1000uF will also be approx 21mm H x 12mm W. I would recommend you replace the 4 x 1000uF / 35V Jamicon SK with 4 x 1500uF / 35V Panasonic FM capacitors..... the Panasonic FM caps are 36mm H x 12mm W so they will slot in seamlessly / room to spare....... more capacitance in this section is what we want.... Panasonic FM 105C rated caps are quality and good for many tens of years in your X-24K. Plenty of wiggle room with the Jamicon SK 16V / 2200uF so I'd be inclined to fit Panasonic NHG series 3300uF / 35V caps here........ 33mm H x 16mm W......... You'll notice a marked improvement (and then some) in every part of the sonic spectrum. Best regards, Mike. |
|
|
|
Post by PinkFloyd on Jun 27, 2017 22:09:24 GMT
Hi Nando, I have been away all day today.... took my friend down to Inverness and back for a Hospital appointment (300 mile round trip) and arrived back home at 9.30pm so pretty much heading for bed soon but will reply tomorrow some time. All I can say, at this time, is the AD825 opamps are NOT the opamps that MF fit into the X-24K: rockgrotto.proboards.com/thread/2172/24k-music-fidelity-dac BUT they are very good opamps for audio / AD825 are highly regarded. I have ZERO experience of the X-24K so am pretty much blind with regards to its topology BUT (from what I can see) the AD825 seems like a decent choice. Best regards Mike. |
|
|
|
Post by PinkFloyd on Jun 26, 2017 20:51:34 GMT
I have had a similar experience with my runner beans. From a good independent nursery I bought about 2 dozen plants; very healthy they were too. Planted them out in late May during good weather and they looked fine. Went away for the first week of June and when I came back the inclement weather had had serious effects. The winds had been too high for the poor little blighters, temperature too low for beans. So I bought some more plants from the same nursery to replace the most damged specimens as well as add to the stock. All was fine until Friday when the winds kicked in again plus the temerature is now rarely aboove 18C. My mange-tout peas however are doing really well. Picking now in good quantites. Sorry to hear about your runner beans Derek..... it's always a sad day when your crop is kicked in the nads by mother nature. I've had a damned good look at the wind damage to the potatoes and it's not as bad as I first thought......... I reckon 25% of the haulms (stalks) have been taken out so that leaves 75% good growth which will now probably concentrate even more on the tubers (the potatoes)..... a healthy plant is not always the best cropper. It was quite funny yesterday..... the Postman (John) saw me out in the garden (unusual) on my knees and said something witty like "are you looking for buried treasure?"...... I told him the truth.... "I'm pruning my potatoes John" "as one does" Shit, the Sharpes Express are starting to flower so will hopefully have a few first earlies in the pot soon..... will let the haulms go yellow and harvest on a daily basis (straight from ground into the pot)......... Looking a lot better now the gales have subsided  |
|
|
|
Post by PinkFloyd on Jun 26, 2017 19:46:27 GMT
Hi Nando, The soldering is pretty shoddy but not the end of the world...... get yourself a hot iron (420C) and a desolder pump....... do each solder joint one at a time........ Desolder pump in left hand, solder iron in right hand...... melt solder and suck up molten solder with the desolder pump (suck it up while the iron tip is still on the joint) and then simply resolder each joint with just enough solder to do the job. Whoever soldered the opamps has used a bit too much solder..... you don't want great BLOBS of the stuff, just a little slightly domed mound of shiny solder. Don't spend too long on the joints....... the 420C iron temperature allows you to go in fast and out fast....... quite literally takes under 2 seconds to desolder / suck up the solder and a second to flow the fresh solder fresh solder in. The thing is...... if it is working fine and you're not too comfortable with a soldering iron then then there is no problem with leaving it as it is. You can tidy up the 825 opamp solder joins on the SOIC to DIP adaptor quite easily..... get some desolder wick, lay it over the 4 joints (per side) and run a hot iron over it..... it will suck up all the excess solder but will NOT remove the solder between the opamp legs and pads. Again, this is only necessary if the unsightly blobs of solder offend your eyes.... if it's all working fine then whack the lid on it and listen to the music I always use the desolder wick technique when soldering SOIC opamps..... it makes for a neater looking job: 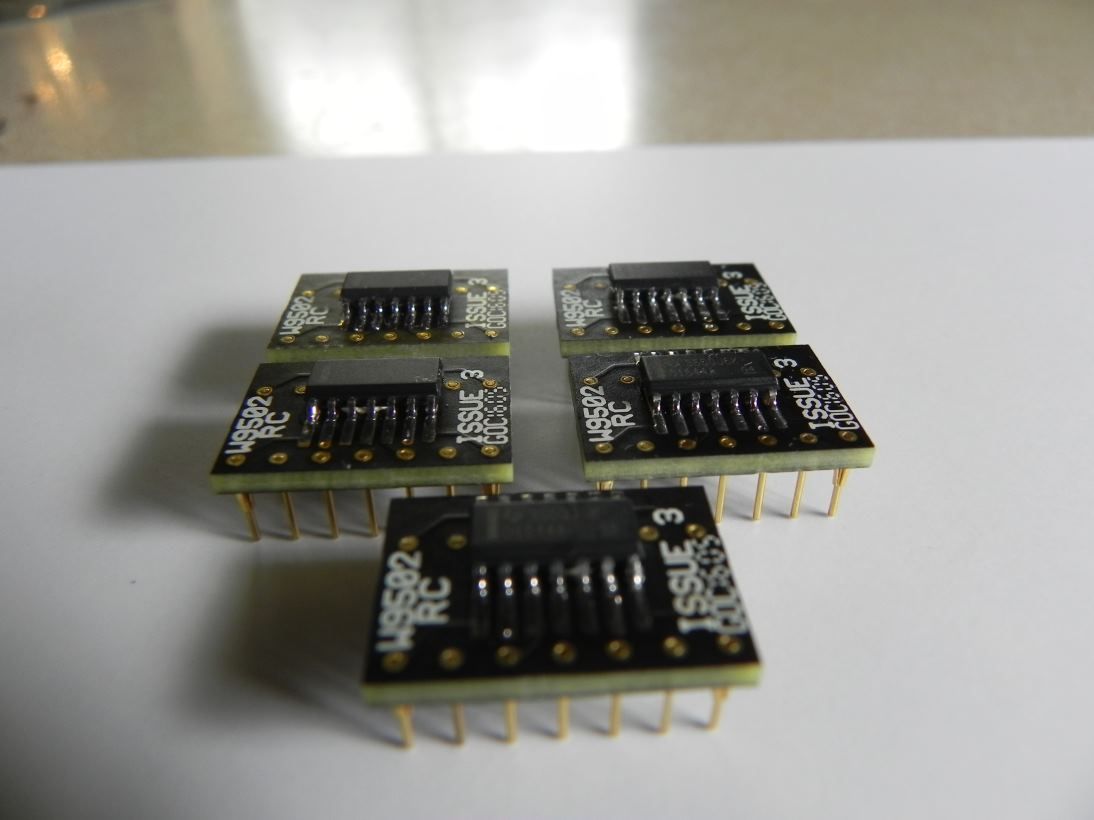 IIRC..... the ceramic cap at the input comes like that from the factory. The wiring solder joints underneath the 47uF 16V non polar capacitor are very shoddy looking..... WAY too much solder! It looks like whoever did that spent way too long on the connection with an iron that wasn't hot enough. Desolder the wires (noting which one goes where) and suck up all that damned solder from the pads (FAR too much, it hasn't even melted properly)...... re tin the wires with fresh solder and tin the pads, that's all you need..... hot iron on the pad, fuse the wire onto the pad and withdraw iron whilst holding the wire in position..... piece of cake. As is usually the case a poor solder joint is caused by spending too long on it with a cool iron..... they key is HOT and FAST! As soon as the solder pools (turns liquid) get your iron out.... 2 seconds max for the wire...... sounds like a short time but when you count out "ONE.... TWO" it's actually quite a long time FIVE would be the absolute longest I would keep the tip of the iron on the pad. Another tip...... use low melting point lead rich solder, it turns to liquid in a second, the stuff I sent you with your X-CAN kit is the way to go Nando. Lead free solder has a much higher melting point and is a bastard to work with.... it is also inferior to lead rich solder BUT "apparantly" green and eco friendly.
BULLCRAP! most of today's "eco friendly" equipment ends up in a landfill site once the 12 month guarantee runs out and the rubbish explodes and is non repairable..... that's really "green" filling landfill sites full of lead free crap designed to last a year at best..... anyhoo, another time and another channel on that major con we are being force fed in the name of being "eco friendly". Do you have any photos of the "top" of the X-24K Nando? Would be nice to see what components are being used but I am 99.7% certain it will be the usual MF "Jamicon" livery Hope this helps. Best regards, Mike. |
|
|
|
Post by PinkFloyd on Jun 25, 2017 13:14:05 GMT
I'm off out now but will reply in full later on........ the opamps are Analogue Devices AD825...... two single SOIC channel opamps on a single to dual convertor plus SOIC to DIP8..... nice opamps.
Mike.
|
|
|
|
Post by PinkFloyd on Jun 24, 2017 19:56:43 GMT
I've had my potatoes growing for a couple of months now and they were coming on really great (healthy / robust plants) until yesterday.............. A damned gale which went on through the night, all of today and due to go on through the night tonight. Strong wind is bad enough but that coupled with horizontal torrential rain is something that potato plants just don't like  Last time I had a look at least one stalk per plant had snapped off and it's due to hit 50MPH gusts tonight so not looking too good for them. It's the 24th of June and today's high was 12C, gales and torrential rain.... pretty pissed off as I have put a fair bit of effort into the potatoes only to have all that work wasted by "the weather". It's not normally this gusty in the summer up here.... come October and onwards 50MPH gusts are classed as a light breeze and 90MPH gusts classed as a bit windy but 50MPH gusts in June? Sod's f**kin' law is what I call it..... the potatoes were doing so well and then, WHAMMO!, mother f**kin' nature comes along and beats the crap out of them! Fortunately, they are nowhere near the flowering stage so (with a bit of good fortune) there will be enough haulms left to produce a decent enough crop..... I spent an hour or so trying to splint the broken stalks with duct tape but that, literally, was like pissing into the wind so decided to call it a day and wait until the storm passes and then assess the damage..... it's true what they say, you can't fight against the forces of nature! I was growing quite a few in pots (as well as in the ground) and managed to get 22 of the pots into the safety of the garage "intact" but most of them were early types.... my second earlies and maincrop are all in the ground so no way of protecting them from the gales.... I tried using the car to act as a windbreak but when the car itself started rocking I realised that it wouldn't do much to stop the gusts hitting the haulms. Earlies are Sharpe's Express, second earlies are Maris Peer and maincrop are King Edward, Maris Piper, Red roosters and Golden Wonder. The earlies / second earlies are all going to be OK as they are in 50 litre pots (bastard heavy pots too!!) just got to hope that Mother Nature is kind with the maincrop potatoes that are planted in the ground. The more I think about it (and you can't help but think about your pride and joy crop) this setback could "potentially" result in a bumper crop..... the last thing any plant wants to do is die without bearing fruit..... a bit of wind damage may well send a message to the engine room telling it to crank things up a notch otherwise you're dead! The optimist part of me thinks that but does a potato think the same way as me? Oh well.... all will be evident once the gales subside..... will the potatoes step up to the plate, will the battering make men of them? A good battering makes us all stronger but is this true of the potato? All will be revealed |
|
|
|
Post by PinkFloyd on Jun 17, 2017 19:49:18 GMT
Hi Adrian, The notch side of the Orange opamp is the side that says DIP..... the DIP end of the chip goes to the notch on the PCB. Your comments regarding the PRAT are very interesting, so much so that I am now biting at the bit to fire my Orange discrete opamp up and have a good listen in the A/B contraption I will be using (the Pro-Ject amp). In my experience (ears only) Adrian, op-amps don't really require any burn in period and are pretty much "there" after the first minute or so of insertion into the circuit. The surrounding passives (caps etc.) DO require a bit of time to form / establish an electron path and, yes, burn-in is more related to passive devices. What PSU are you using with the Graham Slee Bridge? The Orange Discrete opamp draws a bit more current than the AD627...... Should be OK but would be nice to know what the GS Bridge's power supply is rated at. Take your time Adrian, if it takes a year it takes a year...... live with it, listen to it, don't think about it.... just forget it...... keep it bolted down in one part of your system and forget about it. It's the only way to try it out properly..... no hurry / relax and enjoy the music. All the best, Mike. PS: NOT a good idea to begin indoor painting in the middle of June...... I'm going to down brushes right now and get that A/D contraption wired in |
|
|
|
Post by PinkFloyd on Jun 11, 2017 19:53:11 GMT
|
|
|
|
Post by PinkFloyd on Jun 11, 2017 19:51:23 GMT
|
|
|
|
Post by PinkFloyd on Jun 11, 2017 19:44:18 GMT
|
|
|
|
Post by PinkFloyd on Jun 8, 2017 21:32:10 GMT
Please prove me wrong........... that's what this place is all about..... pushing the envelope.
Best regards,
Mike.
|
|
|
|
Post by PinkFloyd on Jun 8, 2017 21:28:53 GMT
This could be interesting. Maybe even mounting the device Under the circuit board? As it is, I only own V2 models, but of course, they wouldn't have a way for the Burson or otherwise to be used. They have some Bursons on sale in Canada, and it got me to thinking where they could even be placed. No room underneath.... trust me........ (if there was don't you think I would know about it?) Best regards, Mike. |
|
|
|
Post by PinkFloyd on Jun 8, 2017 20:52:24 GMT
I'll tell you what....... seeing as I have an X-CANS (V1) on the bench (as I type)..... I'll see if an Orange Discrete opamp (http://rockgrotto.proboards.com/thread/11423/orange-discrete-opamps-on) (very small compared to a Burson) will fit. I know it wont but, hey, may as well prove it with a photo Note to self....... take camera into workshop tomorrow and show how a discrete will not fit inside a V1. Written down on paper too so it will happen! |
|
|
|
Post by PinkFloyd on Jun 8, 2017 20:38:41 GMT
I have never owned a version one, but the op amp sticks out as a question to me. Would a discrete circuit that some companies make for this purpose be a good bet for this? The plug in circuits that they make are pretty expensive, like Burson, and some others. In the end, I just wondered if it is worth it? I'm working on a V1 one right now and I very much doubt a discrete would fit...... that's the problem with them, they are too damned big Very little wiggle room inside a V1 (I mean VERY little wiggle room) so discretes are not really a consideration with such confined / tight space available on the board. Hope this helps. Mike. |
|
|
|
Post by PinkFloyd on Jun 7, 2017 20:45:14 GMT
Hi Mike, Here's an update on my fm reception issue and how I solved it. I have an aerial antenna on the roof of my house, so I went up to the chimney where the antenna is attached and fiddled a bit with the connections. I disconnected and reconnected the 75 ohm cable to the splitter and when I got down, reception on my hard to get station became rock solid. So I am taking out the MD signal booster which really did not like the M1HPA. Then listen to this, I was fooling around late last night and hooked up the M1 directly to my desktop computer's usb jack...WOW!, the sound was incredible. I already had a small usb headphone amp hooked up to the computer, a Audinst HUB Mx2 and the Musical Fidelity amp trounced it in every way! I was using my Grado 325 headphones and the musical presence with M1 was so powerful, smooth and engaging, that's where the baby is staying. This sounds so good I think since you reworked the USB section so well. So thanks again for the great work, I think I will enjoy the amp so much more now in it's new computer based setting. Hope all is well, Regards, Charlie Hi Charlie, Good to hear from you again, sorry I'm late to the party replying but have not had a lot of spare time of late. Adrian's (Freddypipsqueek) advice was good advice but it seems you have managed to sort it out. When I was working on your M1 I had radio 2 on in the background (FM / Old school radio) but the moment I fired your M1 up to listen to it all I got from Radio 2 was a hiss...... definite RFI coming from the M1 and it was obviously being generated from the switched mode power supply inside the M1. Anyhoo....... I turned my FM tuner off, bolted your M1 board back into the enclosure, turned the tuner back on and it was a LOT better BUT I could still detect RFI from the M1 SMPS power supply reaching my FM tuner..... nowhere near as bad but bad because it was interfering with my tuner! I clamped a snap on ferrite core onto the mains lead of the FM tuner and all was normal again...... it was similar to one of these: uk.farnell.com/tdk/zcat1730-0730a-bk/ferrite-core-split-4-7mm-50-ohm/dp/2364655?mckv=_dc|pcrid|78108292749|&gross_price=true&CATCI=pla-141995803989&CAAGID=14989786509&CMP=KNC-GUK-GEN-SHOPPING-TDK&CAGPSPN=pla&gclid=CNue9JfJrNQCFViRGwodQboC1w&DM_PersistentCookieCreated=true&CAWELAID=120173390001372749A simple fix and always the first I try...... works 95% of the time. SMPS and old school FM tuners don't really get on well together (neither do Mobile phones and old school FM tuners)...... I won't go round the mulberry bush explaining the why and how of why this is sometimes the case but WILL, quite simply, say that a snap on ferrite core is your best friend in situations like this. I have got loads of them kicking about and more than happy to send you one FOC. Best place to position it is on the mains lead, nearest to the mains input socket to the FM tuner...... does the job. Glad you like the DAC section of the M1 Charlie..... I have now worked on quite a few of them and so happy I got that one right The feedback has been tremendous and just what you and I heard........ "analogue like". Remind me of your details Charlie and I'll ship a mama honker Ferrite clamp over to you All the best from rainy Scotland, Mike. |
|
|
|
Post by PinkFloyd on Jun 5, 2017 20:42:37 GMT
Great work there mate, good to see I've been up to my eyeballs with all sorts of stuff and not really able to spend time posting here..... I feel really bad about "not yet" following up on the Orange discrete opamp but so many things have happened all at once with me (as is usually the case with most people) and I just don't have the time, at this present period in time, to get down and dirty with the Orange Discrete Opamp. Remind me of your details / address and I will send one of them to you in the next post..... that way, you can get the evaluation ball rolling and (hopefully) I will be in a position / want to to dedicate my full concentration / passion once you have gone in with your initial evaluation. PM or email me your shipping address Pip and I will get one in the post tomorrow for you. All the best, Mike. |
|


 With the right caps / values you will not only help your system to survive a LOT MORE than the next 20 years, it will also sound a helluva lot better too!!.

 Last time I had a look at least one stalk per plant had snapped off and it's due to hit 50MPH gusts tonight so not looking too good for them.