Deleted
Deleted Member
Posts: 0
|
Post by Deleted on Oct 5, 2010 17:48:58 GMT
Yes so was mine shaun, if you look at my immotions  ;D |
|
Deleted
Deleted Member
Posts: 0
|
Post by Deleted on Oct 5, 2010 18:20:42 GMT
hi heliharis and Mr rabbit the balance of humor.generosity and expertise are just a few of the things i really like here. it's a GREAT place. a rare thing indeed  as is my wife  anyway on with the kit  take care |
|
Will
Been here a while!  Ribena abuser!
Member since 2008
Ribena abuser!
Member since 2008
Posts: 2,164
|
Post by Will on Oct 5, 2010 18:28:59 GMT
Hi Syd, Nice work, and tidy soldering If you want to get her fired up quick, your local maplins might have some capacitor 'lucky bags' on sale. They tend to have all sorts of value in, and decent brands as well - panny FC, oscons, stargets etc. Might just get you going? |
|
Deleted
Deleted Member
Posts: 0
|
Post by Deleted on Oct 5, 2010 18:57:47 GMT
I would use 35V type minimum. If you are using a 18V transformer the DC voltage on the cap will be around 26V.  Will work with anything between 47uF and 470uF with a minimum voltage of 35V if it's only for testing/checking operation and adjustment. Frans Thanks a million for quick reply. I had about 20 or 30 Elna 100uf 35v so its now working Thanks to Mike once again. His earlier replies and the mass of pics and advice through the thread are genuinely excellent for those like me who love hearing the results and even doing the building, but only with a vague idea of what does what I only have it running with a line out from my iRiver for now but it sounds like its right up there SQ wise. Syd |
|
|
|
Post by PinkFloyd on Oct 5, 2010 19:40:57 GMT
Looking great Syd! Let us know what you think when you connect it to your reference front end  You've got the DC offset etc. set? Mike. |
|
Deleted
Deleted Member
Posts: 0
|
Post by Deleted on Oct 5, 2010 19:58:35 GMT
hi heliharis and Mr rabbit the balance of humor.generosity and expertise are just a few of the things i really like here. it's a GREAT place. a rare thing indeed as is my wife anyway on with the kit take care No worries shaun, not making any excuses, but my sense of humour stems from my days in the forces where a unique blend of sarcasm combined with p"""taking and dark humour is par for the course, it slips out now and again, and no offence was intended or meant. |
|
|
|
Post by PinkFloyd on Oct 5, 2010 20:00:44 GMT
Ian, I came back from town this afternoon, went into the workshop to see if the postman had left anything and..... yep...... a nice big box from China Another pristine enclosure, I'm happy to report.... the only "slight" flaw is the "W" where is says "power" on the front panel but I'll be able to touch that up with a fine artist's brush and some black paint. I went straight in with my 12mm drill bit (to fit the 8mm LED / chrome bezel) and wish I hadn't been so hasty.... the more I look at it the more I think I should have fitted between (and in line with) the power switch and headphone socket. Oh well, it's done now and no way can I undo a "hole" No particular reason I have gone for a large green LED other than they were on sale at JPR.... it's also a bit different from your run of the mill 3mm LED and should look pretty nifty when illuminated.... you'll certainly know the amp is "on" with this puppy! Green = ASG! (all systems go!) I'd like to pimp the enclosure up a bit for you.... I may have a nice chunky chrome toggle switch somewhere (I think it will look more macho along with the big green LED)..... a bit of contrast on the front panel would also help set it off better, I'll see what I can do with the knob and maybe use black front panel mounting screws to give it a bit more eye candy appeal. Your music was influenced by "industry" so I want this to look like an industrious / bullet proof / no nonsense machine.... built to last a lifetime, impervious to abuse type of effort  You can see what I mean about the On / Off switch.... it looks a bit too fragile sitting under that industrious ASG! green LED.... I do think a big, meaty, chrome toggle will look more the part there... it will also have a better feel with a nice reassuring "clunk" when you switch it..... Anyways, I hope to have your amp completed by the end of this week and will give it 48 hours over the weekend and ship next Tuesday. I'll keep you updated with the build. Mike. 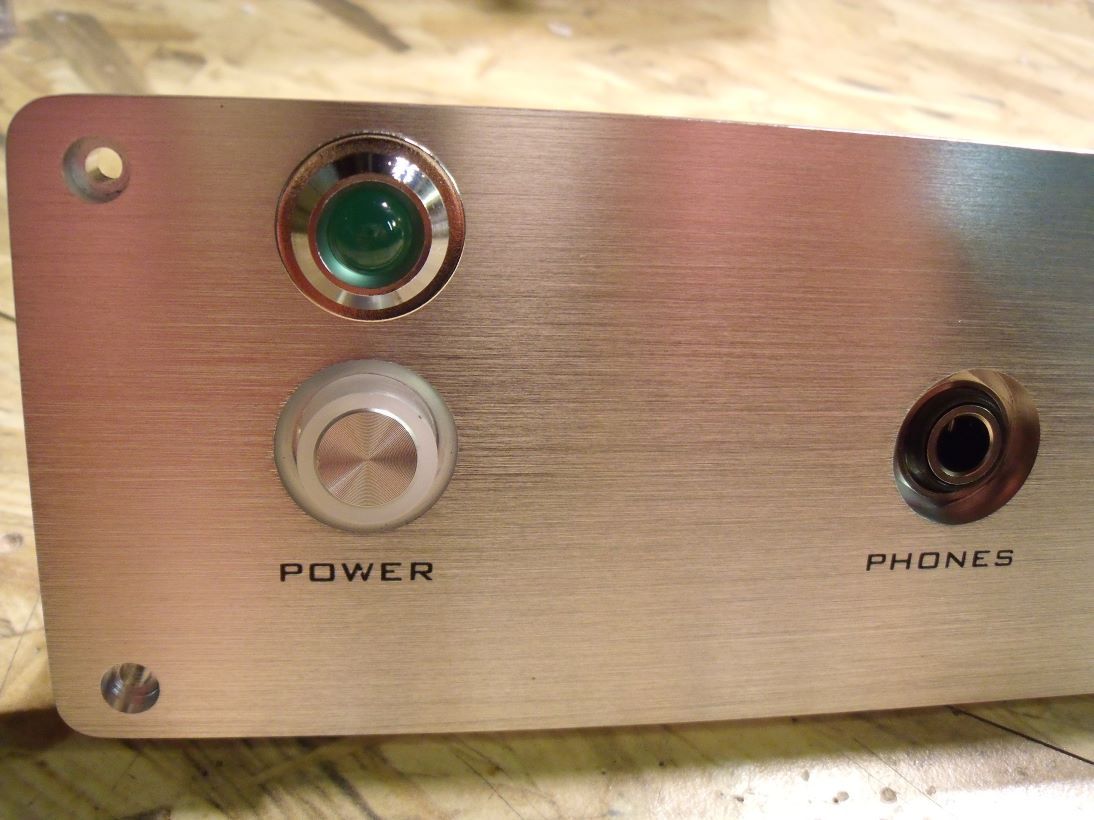   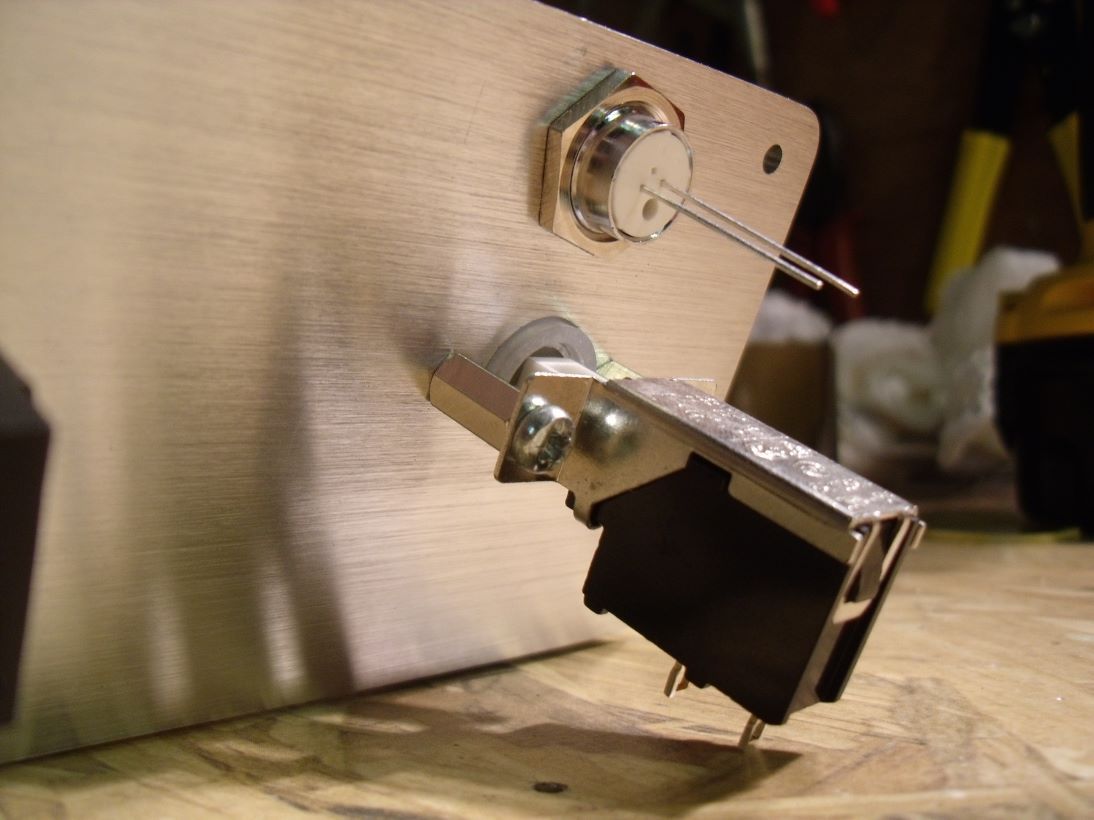 |
|
|
|
Post by PinkFloyd on Oct 5, 2010 20:05:05 GMT
By the way...... Mick, what drill bit do you use for thick aluminium like this? I used a DeWalt HSS type on a very slow speed.... took me about 15 minutes to drill through..... there must be a quicker way to do it than this? I deburred the edges of the hole with one of my dremel attachments, again..... seems a pretty shitty way of drilling a hole.... there must be a more elaborate way? I do have a drill press but my DeWalt cordless drills won't fit into it... my corded Bosch will but it's such a hassle setting it all up and getting it into the "exact" position..... I prefer drilling by hand.
|
|
Deleted
Deleted Member
Posts: 0
|
Post by Deleted on Oct 5, 2010 21:14:52 GMT
'Crushed by the wheels of Industry'!!
Mike, it's really becoming a real amp now!!. The green lamp will look great. The toggle switches like the ones used on guitar amps?
It amazes me how all the bits get put together then mounted into a box and final connections to make something like this.
It'll look so good, I'll be scared to use it for fear of marking it!!
I can't wait to hear it now. It's becoming a 'real' thing; especially after seeing the bits at the start. Funny that you start with a bag of 'sweets', stick them all together to create a beastie like that. I'm also a bit concerned now about my X-Cans. (All three!!!)
Mike, what's the DC offset? You mentioned it to me and also here on the forum? I'm sure the guys brave enough to build their own might need to know.
|
|
Deleted
Deleted Member
Posts: 0
|
Post by Deleted on Oct 5, 2010 21:27:37 GMT
Looking great Syd! Let us know what you think when you connect it to your reference front end You've got the DC offset etc. set? Mike. Thanks Mike, I'm well chuffed so far. Funny you should mention the DC offset, I've often seen it referred to but no idea what it means  So I'm just about to have a poke around; I saw it mentioned also in your help to Claus on this thread. I really should read the copy of electronics For Dummies that my son gave me and I'm not joking. I'll update tomorrow, hopefully to say offset adjusted Syd |
|
Deleted
Deleted Member
Posts: 0
|
Post by Deleted on Oct 5, 2010 21:43:49 GMT
Thanks Ian, as you'll see by the other posts I'm delighted. You'll like the sound of this I think. I've just moved from the iRiver to the PC outputting to a MF V8 DAC, whilst I read up on DC offsets Looking forward to trying it with the dedicated music server PC later on, into the Buffalo. Its very promising, detailed and real guts and power. Its slightly warmer than my AK SCHA which can be very nice, to me, with some of the stuff I like. I'm looking forward to your thoughts when you get yours as, like you I also love the modified V2. If it got no better than this I'd still be very happy. Syd |
|
Deleted
Deleted Member
Posts: 0
|
Post by Deleted on Oct 5, 2010 21:50:04 GMT
Hi Syd, Nice work, and tidy soldering If you want to get her fired up quick, your local maplins might have some capacitor 'lucky bags' on sale. They tend to have all sorts of value in, and decent brands as well - panny FC, oscons, stargets etc. Might just get you going? Hi Will, as you'll have seen I got sorted with Frans guidance. Think about the AK amp etc I'm about to build....... , I therefore have loads of capacitors ready to go, just need the patience to read all Alex's documents. You have mentioned those bags before, I really must go and have a look but I have never been impressed when I've been in our local one, be interesting to see how I get on. Syd |
|
Deleted
Deleted Member
Posts: 0
|
Post by Deleted on Oct 5, 2010 21:56:48 GMT
By the way...... Mick, what drill bit do you use for thick aluminium like this? I used a DeWalt HSS type on a very slow speed.... took me about 15 minutes to drill through..... there must be a quicker way to do it than this? I deburred the edges of the hole with one of my dremel attachments, again..... seems a pretty shitty way of drilling a hole.... there must be a more elaborate way? I do have a drill press but my DeWalt cordless drills won't fit into it... my corded Bosch will but it's such a hassle setting it all up and getting it into the "exact" position..... I prefer drilling by hand. Yes know where your coming from Mike, its a catch 22 situation drilling any size hole above 5-6mm by hand into any reasonably hard material, and the thinner the material the more difficult it becomes with a standard drill bit which is what your using, thats fine and not the problem on 6-8mm Ali as long as its sharp. Any lateral movement in either work piece or drill will result in a threepennybit shaped sh"ty hole, drilling on a slow speed tends to alleviate this to a certain extent but takes forever to complete. Ideally the work piece should be secured to the surface plate of a pillar drill, and spotted with a center drill, and drilled through at about 800rpm for a 12mm hole through 6-8mm ali, with some sort of lubricant such as WD or parafin on a one off basis. This would give a nice round hole to size with a good finish in less than 10 sec. As most don`t have a pillar drill, there is no easy answer im affraid Mike, its pot luck by hand on the quality of hole you end up with, in relationship to the time it takes to achieve. I just use a nice sharp 90deg countersink on small holes for deburring at slow speed. Hope this helps, as with most jobs, without the correct tooling its a matter of making do. Mick. |
|
|
|
Post by PinkFloyd on Oct 5, 2010 22:14:41 GMT
It will be ZERO on your Panda |
|
|
|
Post by PinkFloyd on Oct 5, 2010 22:26:19 GMT
By the way...... Mick, what drill bit do you use for thick aluminium like this? I used a DeWalt HSS type on a very slow speed.... took me about 15 minutes to drill through..... there must be a quicker way to do it than this? I deburred the edges of the hole with one of my dremel attachments, again..... seems a pretty shitty way of drilling a hole.... there must be a more elaborate way? I do have a drill press but my DeWalt cordless drills won't fit into it... my corded Bosch will but it's such a hassle setting it all up and getting it into the "exact" position..... I prefer drilling by hand. Yes know where your coming from Mike, its a catch 22 situation drilling any size hole above 5-6mm by hand into any reasonably hard material, and the thinner the material the more difficult it becomes with a standard drill bit which is what your using, thats fine and not the problem on 6-8mm Ali as long as its sharp. Any lateral movement in either work piece or drill will result in a threepennybit shaped sh"ty hole, drilling on a slow speed tends to alleviate this to a certain extent but takes forever to complete. Ideally the work piece should be secured to the surface plate of a pillar drill, and spotted with a center drill, and drilled through at about 800rpm for a 12mm hole through 6-8mm ali, with some sort of lubricant such as WD or parafin on a one off basis. This would give a nice round hole to size with a good finish in less than 10 sec. As most don`t have a pillar drill, there is no easy answer im affraid Mike, its pot luck by hand on the quality of hole you end up with, in relationship to the time it takes to achieve. I just use a nice sharp 90deg countersink on small holes for deburring at slow speed. Hope this helps, as with most jobs, without the correct tooling its a matter of making do. Mick. Thanks Mick, My 15 minute "slo mo" action will have to be the best I can expect "manually" .... it just seems so "yesterday", like making a washer out of a penny piece..... |
|
|
|
Post by clausdk on Oct 5, 2010 22:42:00 GMT
My second Panda got stopped at customs, those bastards.. 20£ just to let me know I have to pay 15 £ those . . .. . .
I would love to try this future solder, but shipping to Denmark was insane 30£ !!
So I will have to look elsewhere..
The Panda is still playing and still very well..
I know it is a bit OT but the bolier thing just made me think of something the wife said the other evening, we were talking about Isopropylalkohol and obtaining it and I wanted to buy some karburator alkohol as it is Isopropylalkohol, then she said
"why don't you take a syringe and go and suck a little bit out of karburator on the car"
I just laughed so hard it hurt and she was just sitting there not getting it, then I had to explain that
1:Our car does not have a karburator..
2:Karburatoralkohol is not something that you put there, it is mixed with the gasolin..
3:the whole fuel feedingsystem is a closed system and can not just be poked in..
There are so many thing women does not understand..
|
|
|
|
Post by PinkFloyd on Oct 5, 2010 22:45:46 GMT
'Crushed by the wheels of Industry'!! Ian..... This will probably be the last amp I put together but it will most certainly be my best..... I'm putting everything into this build, hope you enjoy it I am thinking of going to sea to catch some fish. Mike. |
|
|
|
Post by PinkFloyd on Oct 5, 2010 22:53:46 GMT
Claus..... PM me your address (again!) I'll send you a few metres over (enough to do three amps).....
Mike.
|
|
Deleted
Deleted Member
Posts: 0
|
Post by Deleted on Oct 6, 2010 5:14:47 GMT
'Crushed by the wheels of Industry'!! Ian..... This will probably be the last amp I put together but it will most certainly be my best..... I'm putting everything into this build, hope you enjoy it I am thinking of going to sea to catch some fish. . Seriously? Well, you've got another to do as well haven't you? I hope the Pink Pig Sig goes on it Mike ..... Maybe you could open a Scottish sweat shop and have everyone soldering different bits together for you. What with the recession, the fish restaurant people may need a job and you can repay them for their 'kindness' in serving up crushed ice as a course. (Funny enough, my wife and I were having a laugh about that last night) .... who else do you owe a favour to? You could call it the Pink Sweater or the 'Pink Scottish Sweater'. Get everyone who's given you grief and chain the buggers in there. The Ex can clean the toilets.  Frans could be technical adviser, Claus the leather department, Christian the 3D area and surround sound department, Colt could do the complaints, Alex the valve specialist area, I'd have to do the cafe on the top floor, and Chaz of course, 'staff well being'.  It's a Scottish version of 'Are You Being Served?' Are yooo frrreeee Mr Humphries? Aahm frreeee and wot yooo goin' ta make of it?' Sorry!! I'm really looking forward to this amp. It's really good seeing it put together bit by bit. While they'e working in there for you, you could take a trip to Glasgow. There's a very good fishing shop there 'the Glasgow Angling Centre' and buy yourself a 15 foot beach rod. That way, you can hoof it out there from the beach and sit with a fag and a beer. The sea up there is truly sick making!! You never know, you might start using portable amps then as well - I caught a really nice fish while Thomas Dolby was singing 'One of my Submarines is Missing'!! very apt.  You just don't want to hook a Killer Whale. Or perhaps I should say, you don't want to let a Killer Whale hook you. (or a seal) It's a bit sad that you won't be making any more though. I felt that the Panda had given you a new lease of life; certainly in the enthusiasm stakes. However, same with all 'jobs' I suppose - I also had to move my backside and do something different or else I would have bust a gasket myself. Ian |
|
Deleted
Deleted Member
Posts: 0
|
Post by Deleted on Oct 6, 2010 16:50:56 GMT
hi all I've spent a few hours soldering the resistors and diodes to the board and hit a snag. which brings me to my second stupid question. ;D sq2 i have two pairs of glass bodied diodes left which i guess are the IN4148 and the 3.9 Zenner. the snag is i can't see the markings on the bodies. one set look bigger with a thick black line and the other set smaller with thinner lines.  if anyone could save me a 20 mile round trip to maplins to get a magnifier it would be most appreciated. hope that makes sense. take care |
|
Deleted
Deleted Member
Posts: 0
|
Post by Deleted on Oct 6, 2010 17:41:18 GMT
Shaun There may be better ways to describe them but the 3.9 diodes are 1/3 longer at 4mm and the black marking is quite distinctive. Maybe the size of them in these pics relative to their neighbours will help.   Sorry the pics are a bit fuzzy but didn't want to use the flash and its quite high magnification. Syd |
|
|
|
Post by PinkFloyd on Oct 6, 2010 19:41:08 GMT
Got the board and transformer into position today and did a quick fire up... both 1k5 resistors trimmed to 1.3V per side and DC offset pretty much 0mV both channels. It also gave me an opportunity to fire the green LED up.... looks pretty cool, certainly a lot different from the current trend of tiny on / off indicators.... nice and subdued too, not retina burning. I will probably have the hook up wire and pot extension kit fitted tomorrow sometime so, all being well, should be listening to it tomorrow night. Ian I have decided to fit a bit of "bling" to the front panel and have ordered up a nice, expensive, Audio Note 26mm gold plated knob.... nice and weighty too so should have a lovely smooth feel to it For the hook up wire I am going with insanely expensive (for wire) solid silver 7/0.20 with the signal wires coated in pink PTFE.... the outer screening braid is made from silver plated OFC copper and is also insulated with pink PTFE.... this gear is said to have "amazing" clarity So, Ian, we've got a bit of an industrial / audio jewellery type freak going on here Clunky toggle switch, Industrial type LED, 24K gold plated knob and solid silver hook up wire! I'm also going to incorporate a small piece of iron pyrite (fools gold) just under the inputs... this is a personal thing, I am a great believer in the power of the pyrite and it's ability to ward off negative vibes.... I have fitted a lump in quite a few amps and believe it works Anyways, should be up and running soon 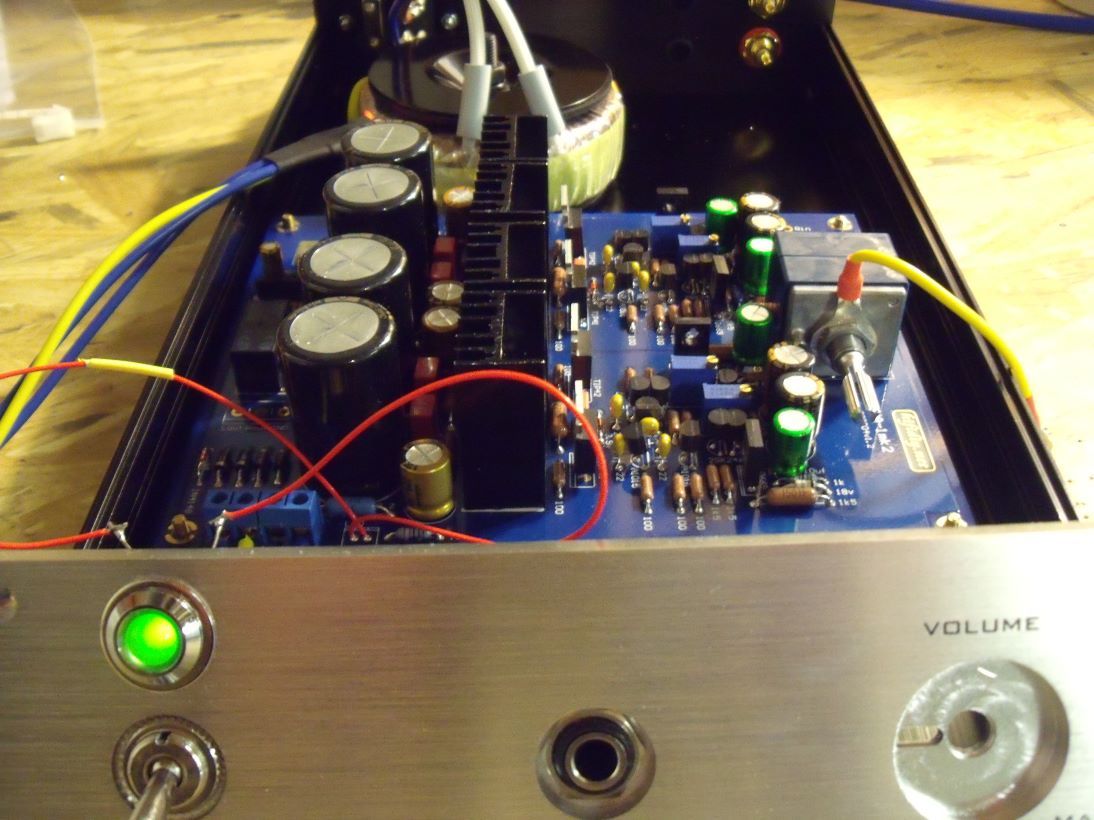 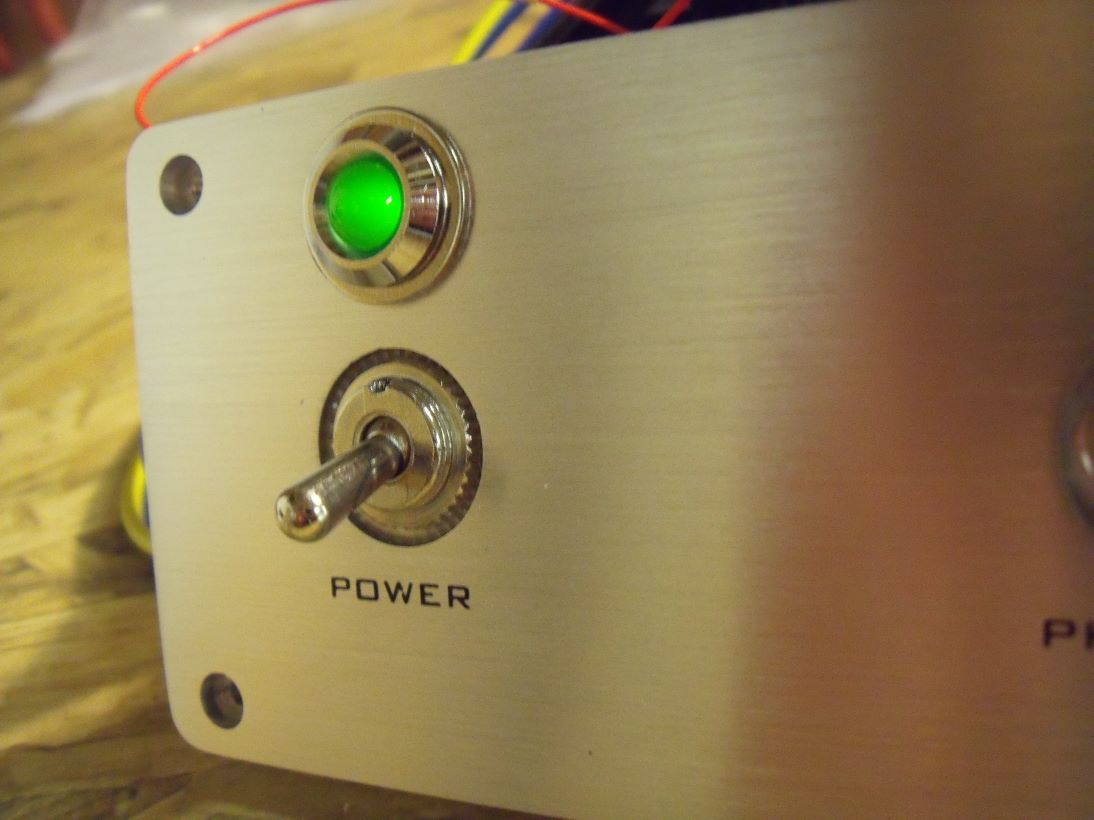  |
|
Deleted
Deleted Member
Posts: 0
|
Post by Deleted on Oct 6, 2010 20:34:34 GMT
That looks REALLY good..... omg. It looks like a Bling alright!! The lamp looks really good Mike. Jeez - I'm listening to 4 amps down here now and once that one arrives, I'll be hooked up for the duration!! Mike that looks the business for sure. Pictures on here never look as good as the real thing either. I noticed that you new (pre new new) Pinkies look so much better than the pics you posted. Also these yellow Banzais. The pics just don't do the justice. I'm getting all fired up now. It's been fast but watching it grow on here has been SUPERB. Mike, the pics and instructions need filtering out so that guys have a reference. Even the box front looks amazing ... but on second thoughts, they'll all get the same bits eh? I'll set you up with a piece of cod from that restaurant and a refreshing glass of ice.
|
|
|
|
Post by PinkFloyd on Oct 6, 2010 21:22:05 GMT
On a serious note guys..... I was "literally" moments away from death today....... I was working on Ian's Panda and totally forgot the amp was powered up. I had gone for my dinner and came back an hour later thinking to myself "I may as well heatshrink the live and neutral".... you can see the two pieces of grey heat sleeve waiting to be positioned over the IEC terminals... Sooooo.... I slip the sleeving over the phase (Live) connection and then slip the sleeving over the neutral connection..... out with the heat gun and heat them up..... nice job I "then" realise that the amp was switched on! If my fingers had touched live and neutral I could have been electrocuted Alex is always droning on about safe working procedures and this is is a PRIME example...... ALWAYS ensure you have your wits about you and NEVER work on an amp when it is switched on.... We all think we know what we are doing and, most of the time, we do but there's always going to be the odd moment where we can't see the wood for the trees. I had one of those moments today and am lucky to be alive..... if my finger had shorted across live and neutral I would possibly be typing this from Heaven (or more likely Hell) right now  One small slip in concentration can result in DEATH so please ensure you have the powercord disconnected before working on the amp. Mike. |
|
|
|
Post by PinkFloyd on Oct 6, 2010 21:28:51 GMT
I'll set you up with a piece of cod from that restaurant and a refreshing glass of ice. I could do with a nice crushed ice "intermediate" course right now Ian Unfortunately, my "Intermediate crushed ice maker" has blown a fuse |
|

 ;D
;D as is my wife


 Will work with anything between 47uF and 470uF with a minimum voltage of 35V if it's only for testing/checking operation and adjustment.

 You've got the DC offset etc. set?


