|
|
Post by PinkFloyd on May 14, 2013 18:31:53 GMT
|
|
|
|
Post by theadmans on May 14, 2013 20:27:25 GMT
Looking great Mike - can't wait to hear the upgraded X10D !
My system has come on in leaps and bounds since I bought a Beresford Bushmaster DAC a few months ago. The Bushmaster was sounding excellent through the stock X10D but with these mods it should take it to the next level. The Bushmaster is an excellent buy for around £185 the DAC is superb and the intergral headphone amp drives my HD650s very well (Stanley Beresford did some tweaks at no extra cost to match the amp to my Sennheisers).
|
|
|
|
Post by PinkFloyd on Jun 18, 2013 19:59:50 GMT
|
|
Deleted
Deleted Member
Posts: 0
|
Post by Deleted on Jun 19, 2013 11:38:50 GMT
Mike, Nice Work! And great photos too, thank you VERY much for posting.
Will you post some comments on how the modifications sound? Or perhaps that's Adian's role. As a new owner of the V-CAN 2 I'm intrigued.
Derek
p.s. no need to answer this. I've read back through this thread and re-read the comments on the upgrade to the V-CAN 1. Guess that just about covers it then.
The circuit boards of the v-can 1 and 2 look so similar.. did MF actually change anything when the 1 became 2 ?
|
|
|
|
Post by PinkFloyd on Jun 22, 2013 10:34:48 GMT
Mike, Nice Work! And great photos too, thank you VERY much for posting. Will you post some comments on how the modifications sound? Or perhaps that's Adian's role. As a new owner of the V-CAN 2 I'm intrigued. Derek p.s. no need to answer this. I've read back through this thread and re-read the comments on the upgrade to the V-CAN 1. Guess that just about covers it then. The circuit boards of the v-can 1 and 2 look so similar.. did MF actually change anything when the 1 became 2 ? Hi Derek, The V2 is exactly the same as the V1 apart from one 1000uF capacitor they have removed! You can see the bare slot here: 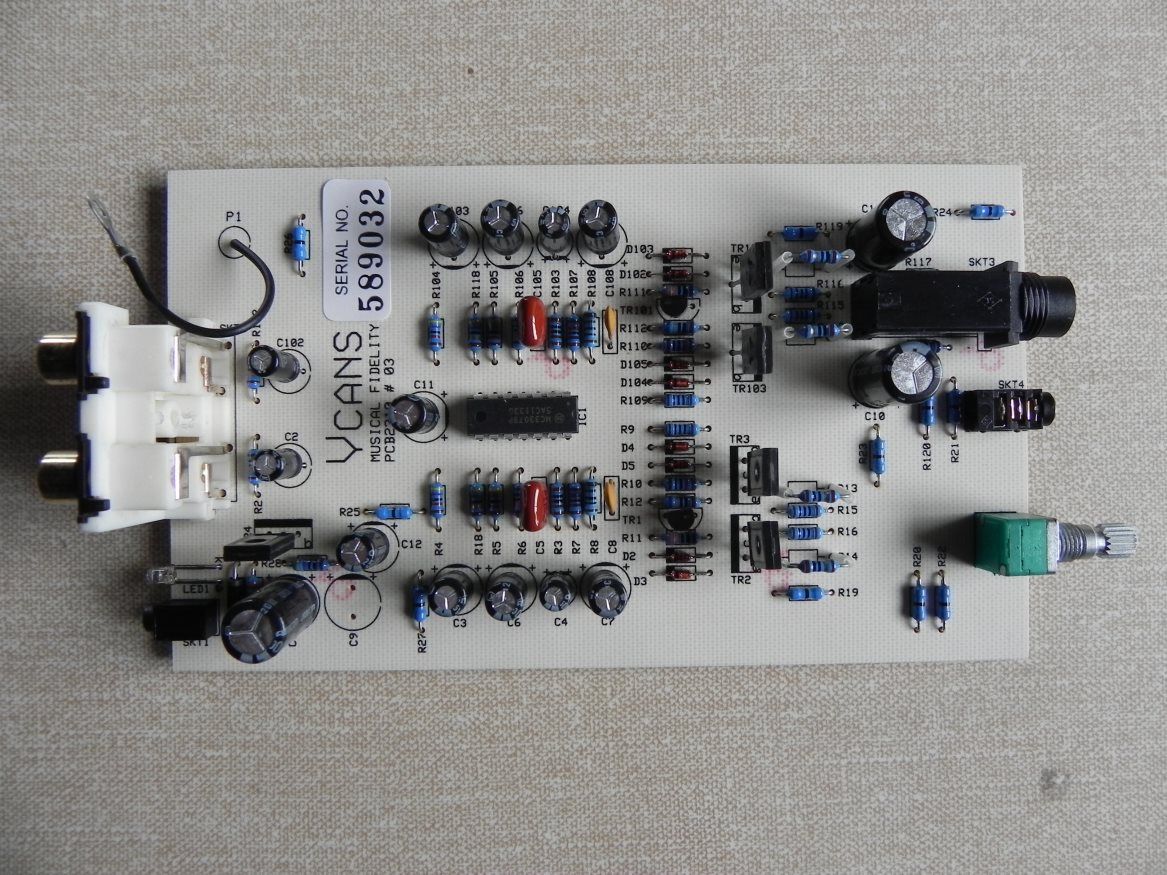 In my opinion the only reason they have removed it is so they could save on capacitors..... there used to be 2000uF (in parallel) there now there is only 1000uF. Of course, the enclosure is different so the "MKll" bit could refer to the different enclosure  |
|
|
|
Post by PinkFloyd on Jun 22, 2013 10:38:44 GMT
Here is a Mk1 I modded.... you can the board is exactly the same as the one that appears in the MKll: 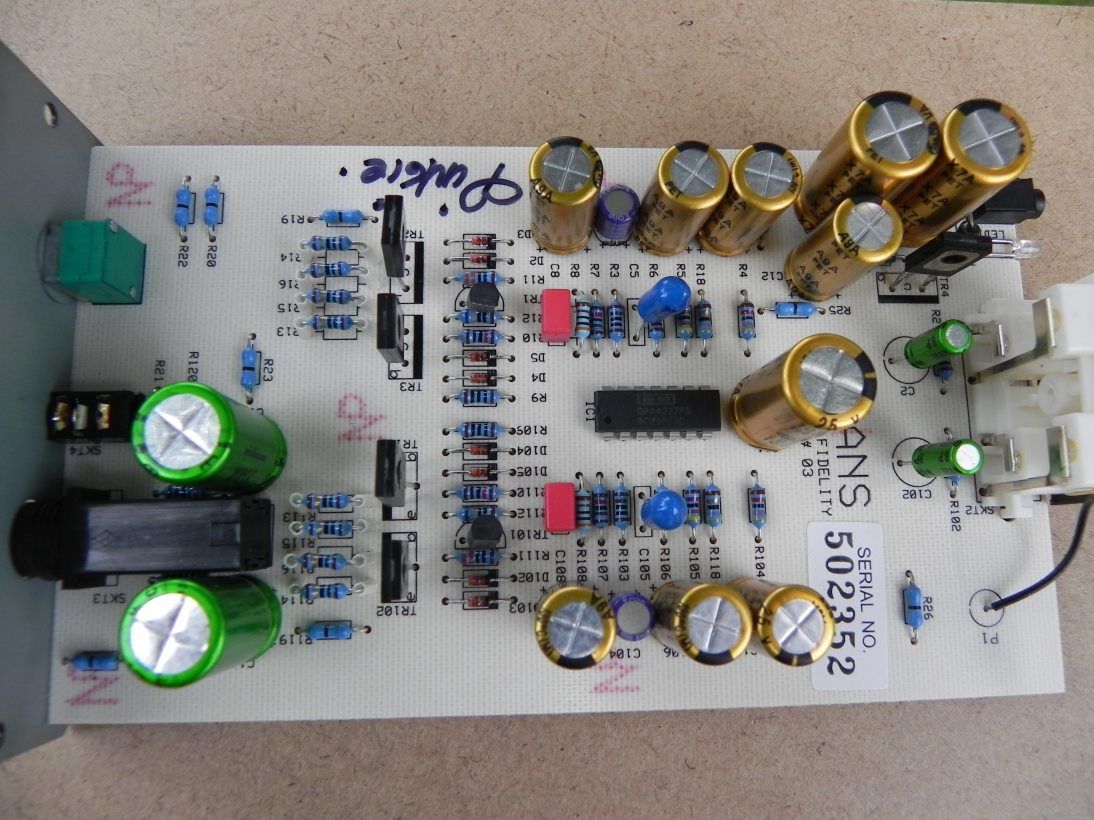 |
|
Deleted
Deleted Member
Posts: 0
|
Post by Deleted on Jun 23, 2013 9:58:04 GMT
I'm sure I read a review somewhere where someone said the Mk2 sounded better than the Mk1. And to quote "What HiFi":
"This Mk II version of Musical Fidelity’s headphone amplifier is a smarter looking affair than the original incarnation, featuring tweaked circuitry to improve performance".
Well I suppose 2 capacitors in parallel swapped for a single one of the same effective value is "tweaked" isn't it?
:-)
|
|
|
|
Post by PinkFloyd on Jun 23, 2013 11:01:15 GMT
The gain has been altered slightly so the volco is not as "immediate" as it was on the V1..... that "tweak" involves two resistors. 2 x 1000uF in parallel has been replaced by 1 x 1000uF, that's it folks  I'll wait to see what Adrian thinks about the mods BUT, to my ears, the V2 sounds a HELL of a lot better / beefier with the increased capacitance mods and opamp swap. The Burr Brown OPA404KP DiFet is perfect in the V2. |
|
|
|
Post by PinkFloyd on Aug 25, 2013 19:23:06 GMT
25th August 2013 - Mike's (Pinkies) X-CAN V3 First I got rid of the 4 x 40ohm (3 watt) wirewound resistors in parallel which made a total of 10ohm. I replaced the four 40 ohm resistors with ONE Mills 10ohm, non inductive 12 watt type. The wirewound resistors are magnetic the Mills non inductive is not.... it runs only warm to the touch but I fitted some heatsinks onto it for good measure (belt and braces). 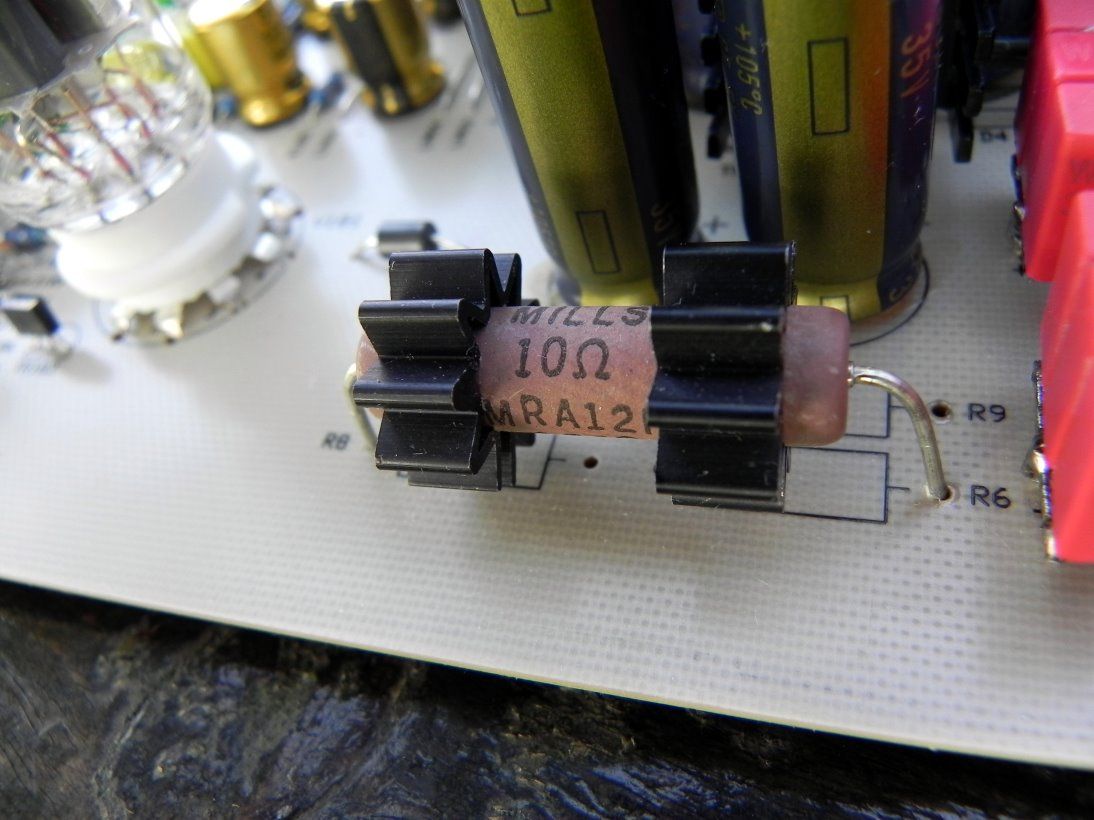 I normally use 10uF non polar input coupling capacitors (or sometimes none at all) but this time decided to try 3 x 3.3uF film caps (WIMA) in parallel giving me almost 10uF. No capacitor is best but, seeing as I will be selling this amp, it's best to have it belt and braces with input caps in place. Film caps are better than electrolytics for this purpose and this seemed a good way to get 10uF of film cap out of relatively small package. You can see both 10uF film "packages" in situ here. 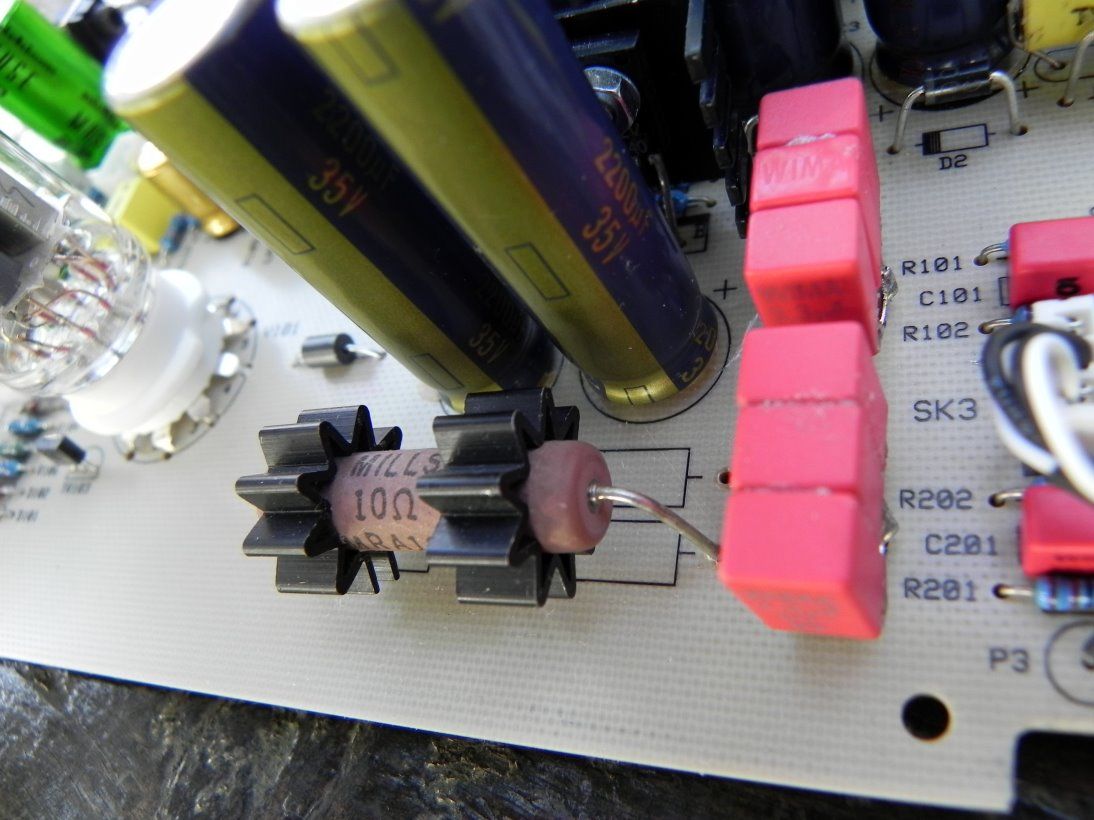 Capacitors are 2200uF panasonics.... the big tall, skinny ones are also 2200uF. ALL Bypassed with 470nF film caps. 100uF caps are Samwha VA series (135C) and are bypassed with 1uF film caps. 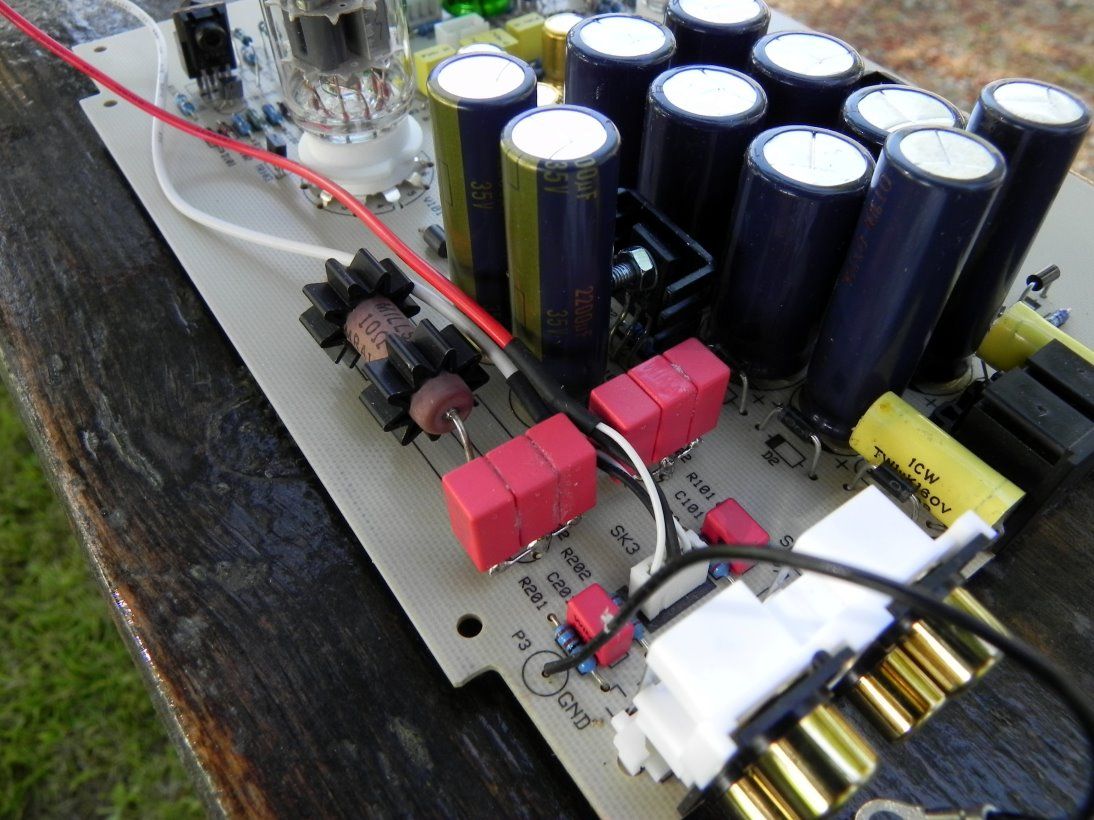 The output coupling caps are Nichicon Muse (non polar) 1000uF / 16V types (the green ones!). 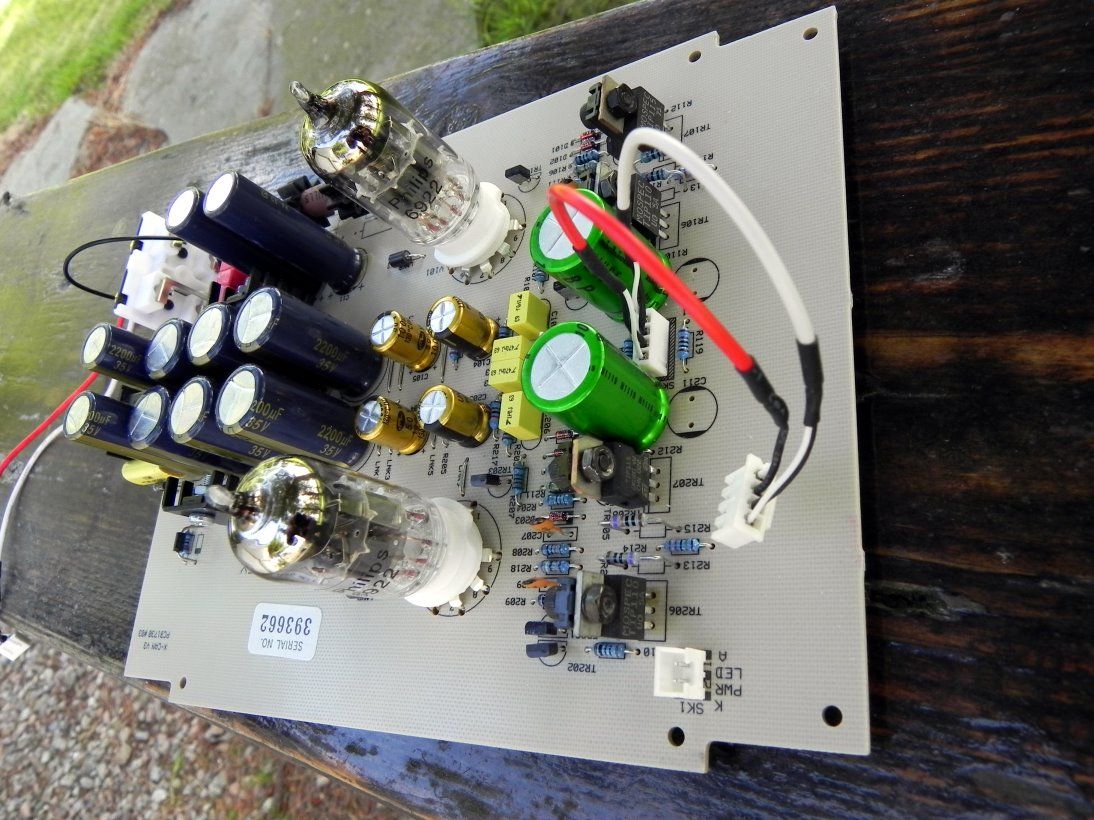 The 470nF film caps were replaced by UK made ICW 1uF types, they are the yellow ones and are 1uF. These are bypassed under the board with 33pF polystyrene caps. 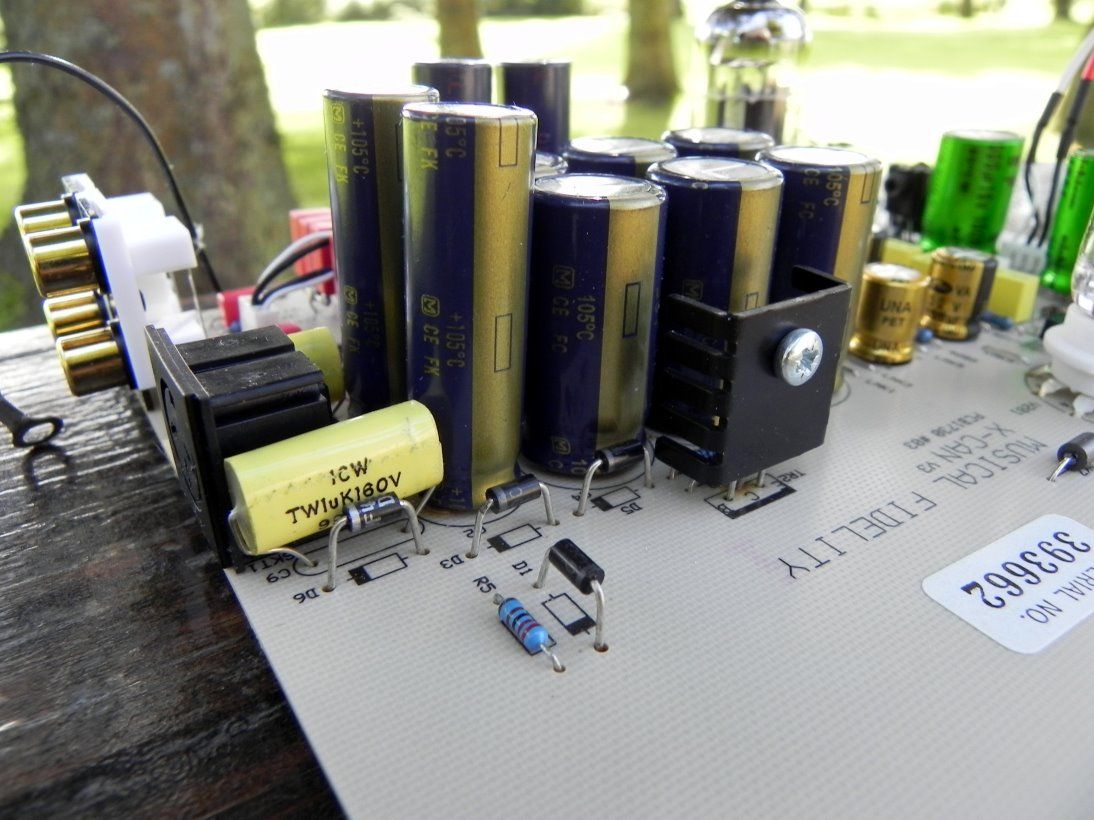 1N4007 diodes were all replaced by Ultrafast UF4001 types. New gold plated quad phono socket has been fitted. Plastic valve sockets were replaced with ceramic types. I've got a crazy large stash of Wima film caps so decided to bypass all of the electrolytics with them.... a total blunderbuss shot of WIMA on the underside  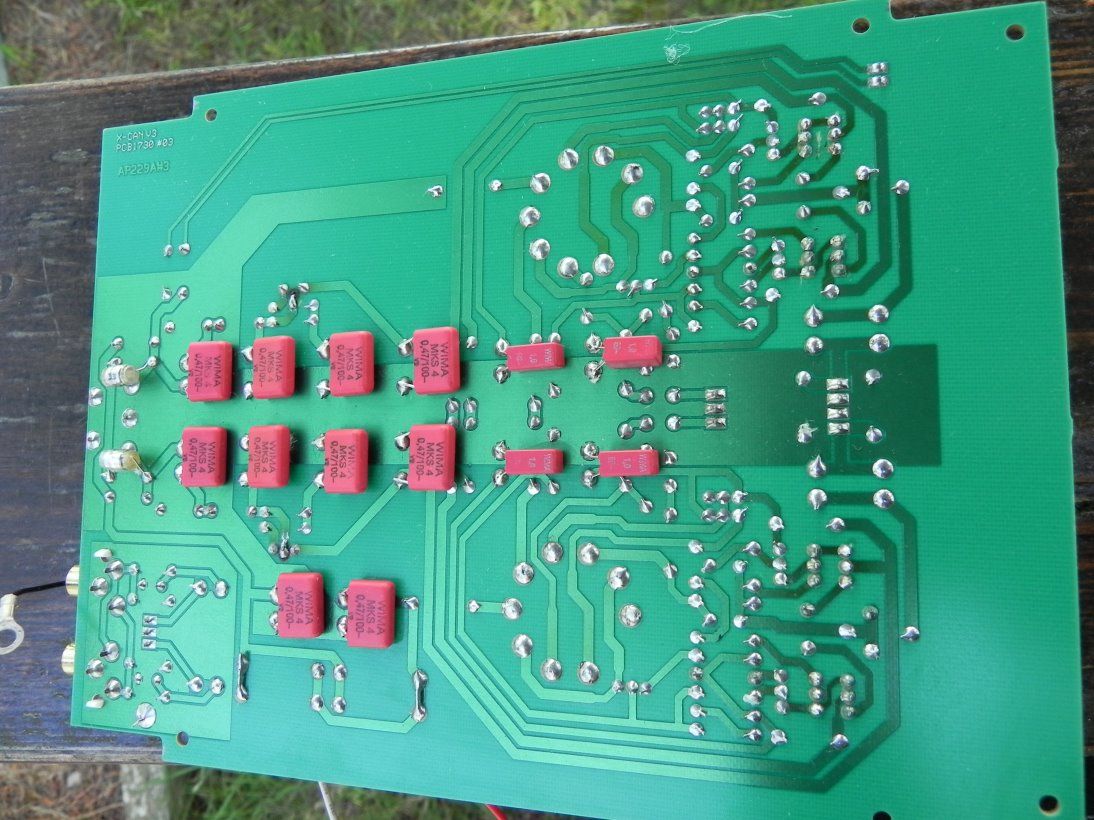 I've had her fired up for a couple of hours now and the results are VERY encouraging indeed.... it's way too early to say anything other as the amp will require a good 100 hours to stabilise BUT, getting rid of the 4 x wirewound resistors and replacing with the Mills 10ohm non inductive type has definitely done something VERY nice to the sound  I may consider incorporating these in my kits after further evaluation (along with the belt and braces resistor heatsinks  ). This one will be going up on ebay in a few weeks time along with one of my (soon to revealed) revamped Pinkies..... I'll put a link to the ebay ad as soon as it's burnt in and ready to go...... I'll be including a very special pair of hand matched valves with the amp, so keep your eyes peeled if you're interested in owning a very special V3 with the very latest Pinkie. 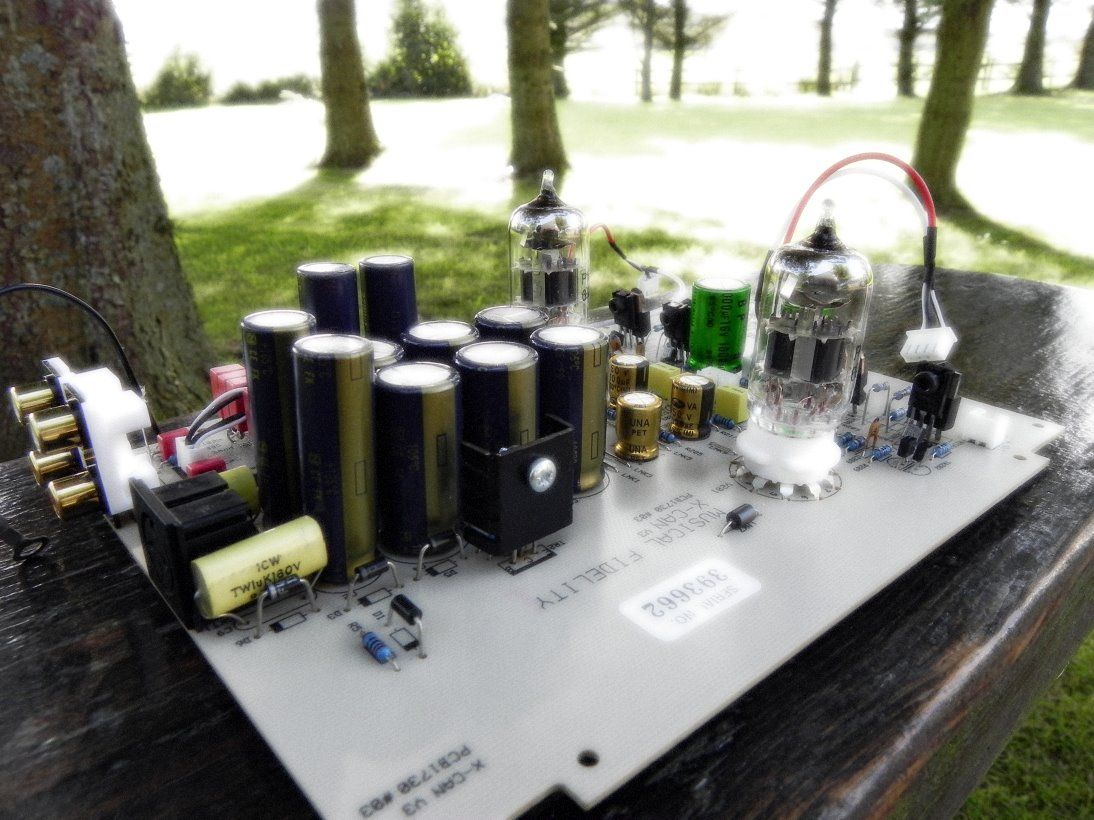  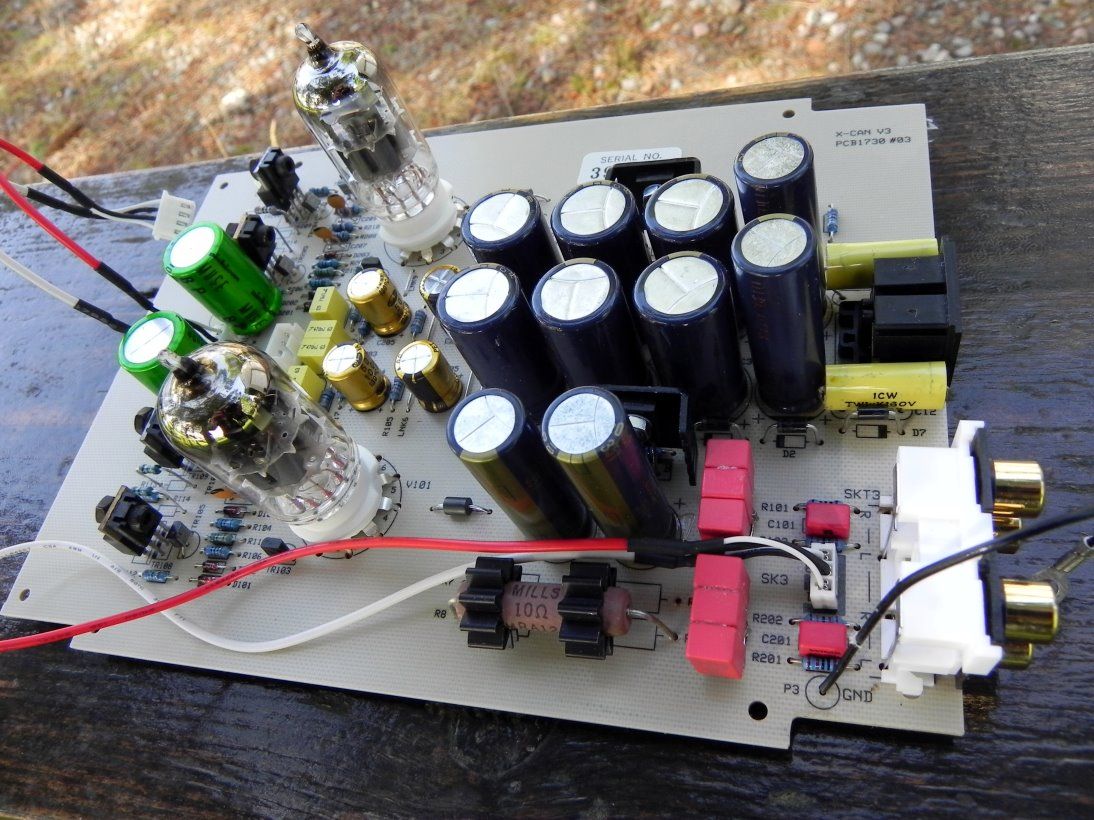 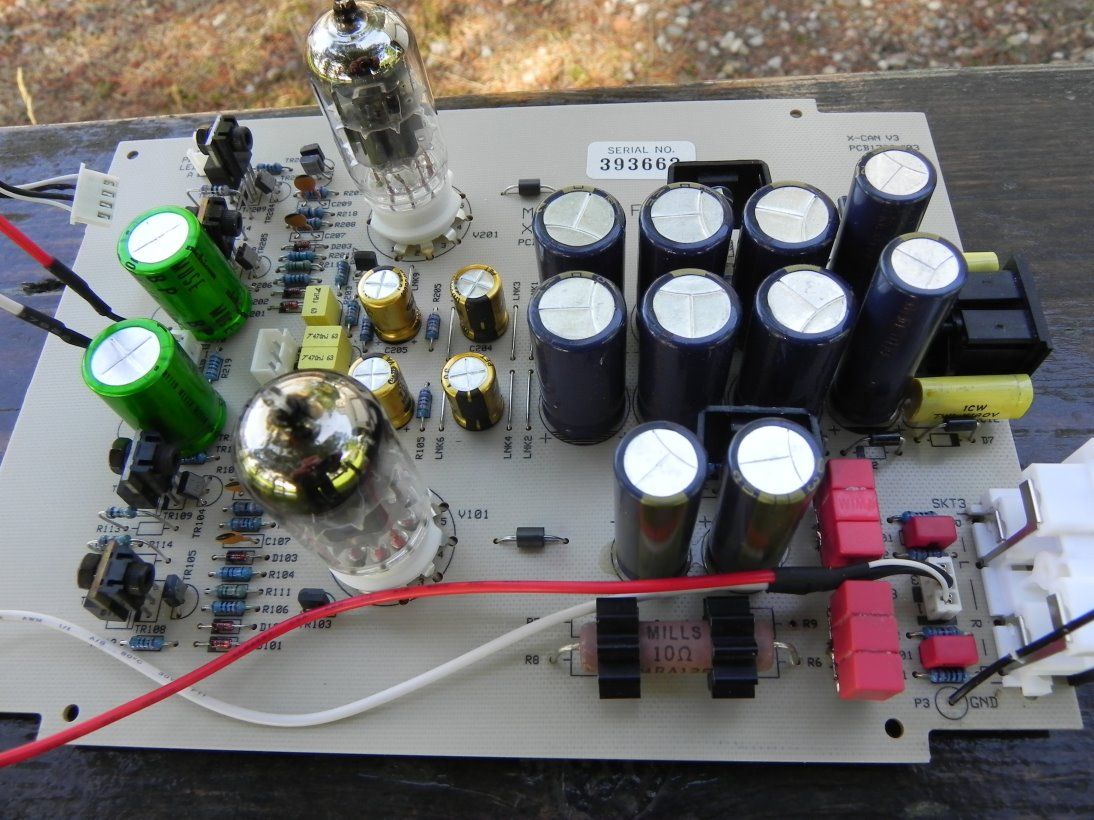 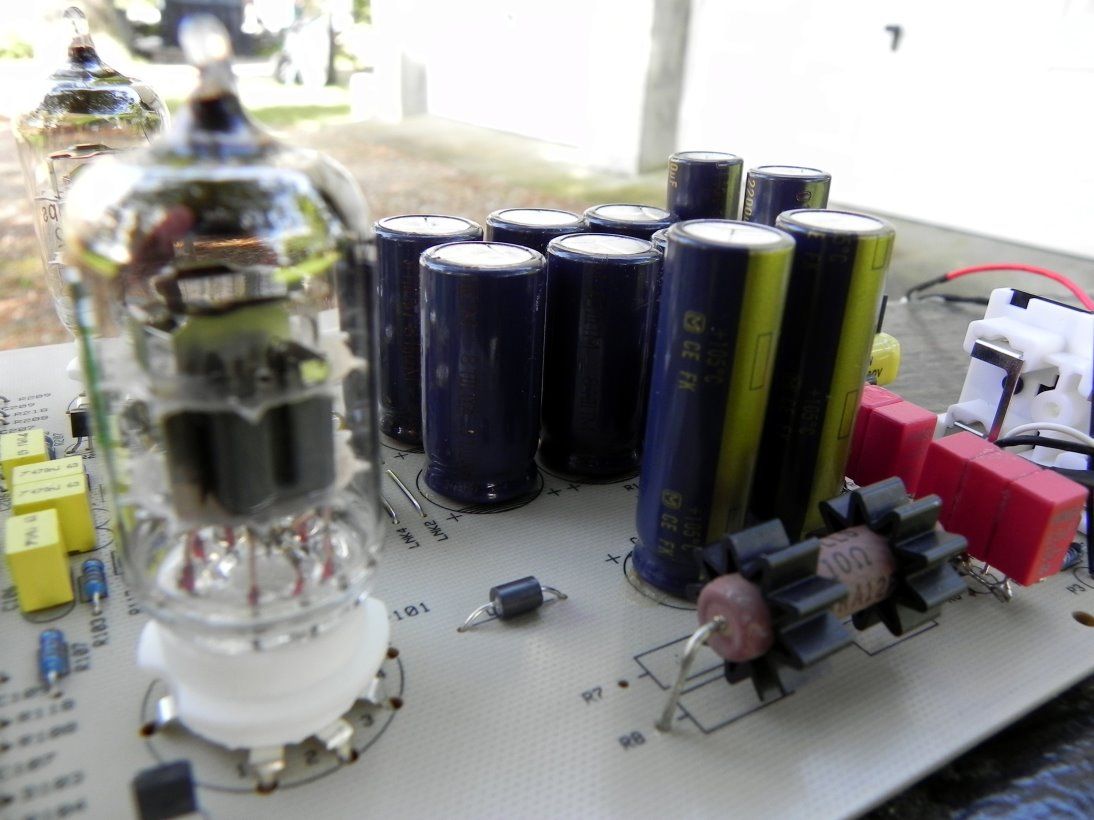   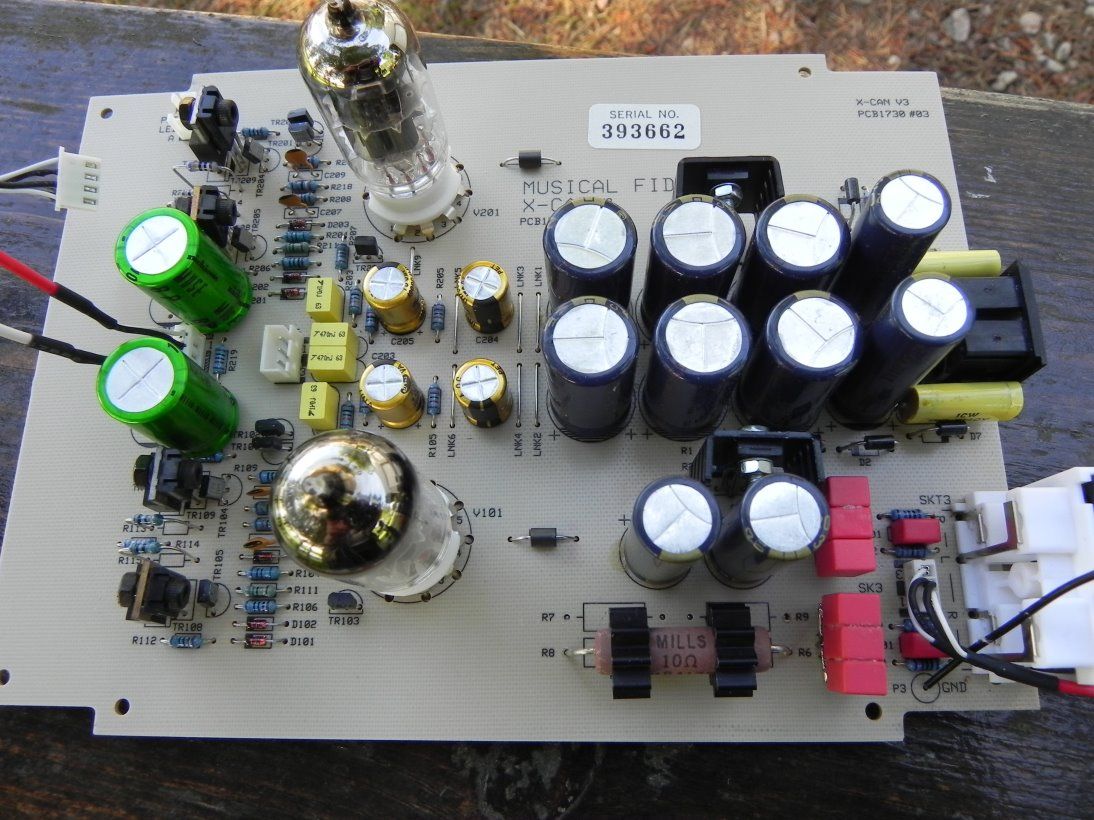 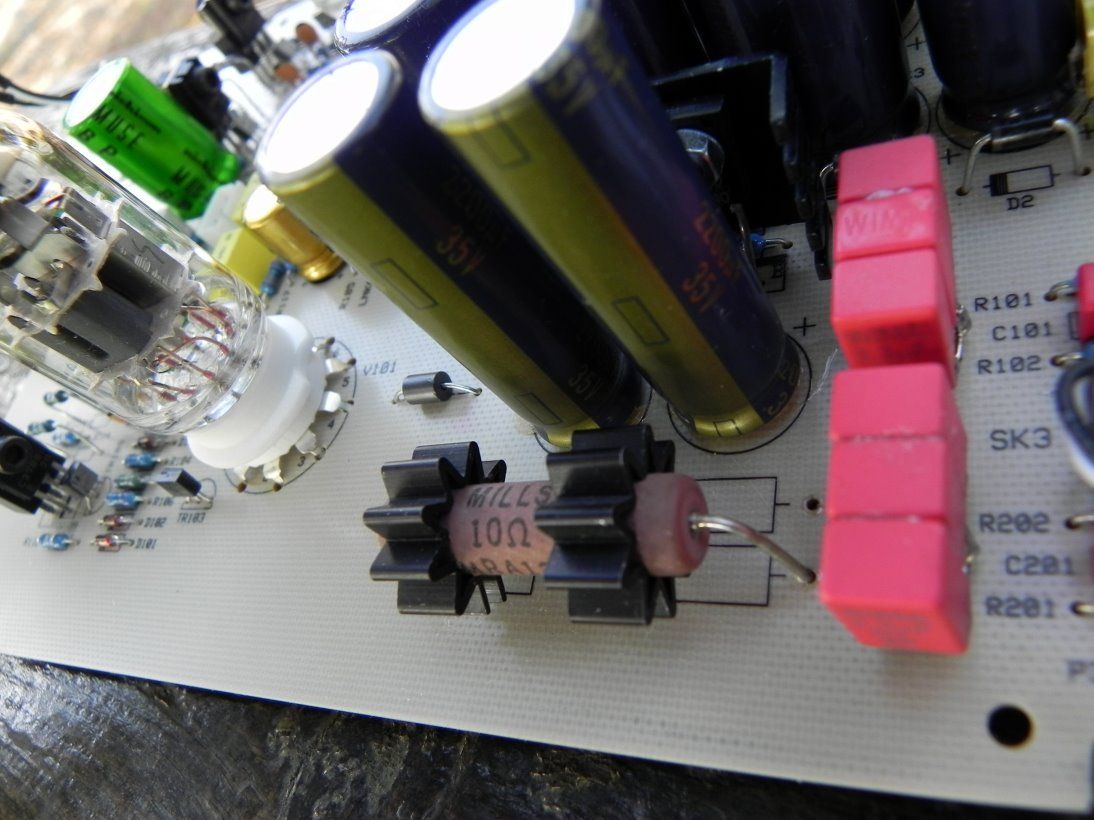   |
|
|
|
Post by PinkFloyd on Sept 27, 2013 20:30:03 GMT
^ will be appearing on ebay shortly..... a lot of work went into it so I'd rather it "finds" it's own price on ebay than setting a fixed price here..... I will be including a brand new Pinkie SE as part of the sale...... I will link to the ebay listing as soon as it's active. Starting bid will be 99p so keep your eyes peeled for this one off opportunity to buy one of these beauties at their absolute best.
Mike.
|
|
|
|
Post by smokeycigar on Oct 13, 2013 8:04:50 GMT
HI Mike,
Can you comment on the sound changes after upgrading the 4 x 40ohm (3 watt) wirewound resistors to the 1 Mills 10ohm?
|
|
|
|
Post by PinkFloyd on Oct 13, 2013 20:17:41 GMT
HI Mike, Can you comment on the sound changes after upgrading the 4 x 40ohm (3 watt) wirewound resistors to the 1 Mills 10ohm? Hi Smokey, These things take time and I can finally say, after listening to my "known" mods with the addition of the solitary Mills 10ohm resistor, it has made an improvement. Imagine a window with a pair of curtain nets on it.... you can see through the window but the scenery is veiled...... the solitary 10om Mills (non inductive) resistor has removed that net curtain and the scenery (the sonic tapestry) is a lot more lucid..... the sonic stage is a lot more transparent with lots of minutiae showing up that was NOT present with the stock resistors. Rick, you won't know him, was the guy who really got me into non inductive resistors, and I must admit that ONE non inductive Mills resistor sounds way better than four el cheapo wirewound resistors (magnetic types) There's more presence, a greater insight into the recording and a generally more open sonic window. Well worth doing, the 10ohm Mills resistor won't break the bank and this little tweak takes the V3 to another level. They do say that "less is more"...... they are correct in this instance....... why use FOUR when you can use ONE high quality part to do the same job...... simple answer, The bean counters at MF went down the cheap route...... they are out to make profit (quite right too) and will fit any parts that will "do the job" at the lowest possible price. The designer designs...... the bean counters get his design / BOM down to the cheapest possible (and we are talking pennies here!)..... it works, it goes to market, it sells....... that's all they are bothered about...... it works, it sounds half decent. My mods (or should I say Parts?) take it to the level the original designer would be happy with..... in places my mods exceed the original designer's expectations..... I use parts and "values" (ie: increased capacitance) that the bean counters just would not entertain, not now, not ever, not even if they were drunk! Another thing about modding is "time"...... 4 resistors replaced with ONE? Will it work, will it go up in smoke? Will it do the same job, or better? You don't just fit a new "part" and start a placebo rave about how high the highs are and how the lows are now making your toenails curl up etc....... Give that part at LEAST one month in circuit...... listen, listen again, monitor that part (in this case the 10ohm Mills resistor) touch it with your finger (if you don't have a temp. probe)...... keep an eye / ear on it. I am 101% confident that the Mills 10ohm non inductive resistor not only SOUNDS better than the 4 x wirewound resistors but it also runs cooler...... I can safely say that "now", after having the amp permanently on for two months, that the Mills 10ohm non inductive resistor mod is 100% good to go...... Let's put it this way, no WAY would I go back to the 4 x wirewound CAS resistors (Cheap as shite). All the best, Mike. |
|
|
|
Post by smokeycigar on Oct 14, 2013 10:07:55 GMT
Hi Mike,
Thanks for the reply.
I will be trying this mod out on my X-can V3.
I also have some Mundorf 20 watt non inductives that I might give a go.
Any issue with modding the X-10 V3 the same way (same resistor/ value)?
|
|
|
|
Post by PinkFloyd on Oct 14, 2013 10:48:01 GMT
Hi Mike, Thanks for the reply. I will be trying this mod out on my X-can V3. I also have some Mundorf 20 watt non inductives that I might give a go. Any issue with modding the X-10 V3 the same way (same resistor/ value)? Nope, the non inductives are fine in all of them..... the mundorf 20 watters are huge, you may have to drill the board to get the suitable pitch? |
|
|
|
Post by smokeycigar on Oct 15, 2013 12:08:41 GMT
Cool, I have just upgraded my XCAN V3 with the 10ohms mills + two ceramic sockets. Burning is as we speak.
Will give it a listen in the next few hours.
|
|
|
|
Post by smokeycigar on Oct 15, 2013 13:19:38 GMT
Update, So far everything sounds great!! Am sure will improve with time. Have read on this forum that it will require around the 200 hours mark to complete burn in. In total I spent about $190 AUD on components and say $25 AUD in shipping, so for a grand total of $215 AUD I'm extremely happy with my amp now. For Reference, the parts (inc prices) I used are below: XCAN V3 6 * 39000uf 35v Panasonic FC (18mm diameter) ($1.50 ea) - Bypassed with 6 * WIMA mks4 100v 1.0uf ($0.78 ea) 2 * 2200uf 35v Panasonic FC (18mm diameter) ($0.88 ea) - Bypassed with 2 * WIMA mks2 100v 0.22uf ($0.83 ea) 2 * 2200uf 35v Panasonic FC (16mm diameter) - ($3.20 ea) - Bypassed with 2 * WIMA mks2 100v 0.22uf ($0.83 ea) 4 * 100uf 35v Panasonic FC (XXmm diameter) 7 * Super Fast SF37 3A diodes 600v ($0.60 ea) 2 * WIMA mks4 100v 1.0uf ($0.78 ea) 2 * Nichicon ES 1000uF 16vdc ($1.60 ea) 4 * Nichicon ES 10uF 16vdc ($0.25 ea) 1 * MRA12 10 ohm ($4.40 ea) 2 * ceramic gold plated sockets ($4.00 ea) 2 * RU-6H23-EB Tubes ($42.00 ea) Power Supply 1 * multicomp box-diecast-ip65-222x146x55mm - ($9.40 ea) 1 * multicomp inlet-iec-dpst-with-fuse-holder ($13.92 ea) 1 * 0.47uf Mundorf Mcap Suprteme 425VAC ($15.00 ea) 1 * 80VA 2 * 12v torodial transformer ($41.00 ea) LUMBERG PLUG, DIN, STRAIGHT, 3WAY - ($10.60 ea) AMPHENOL SOCKET, XLR, PANEL ($10.90 ea) In conclusion, I must thank RockGrotto and Mike for all the reference material, and site content. Mike, Thank you so much!! You are a gentleman and scholar  |
|
|
|
Post by PinkFloyd on Oct 15, 2013 21:26:29 GMT
Update, So far everything sounds great!! Am sure will improve with time. Have read on this forum that it will require around the 200 hours mark to complete burn in. In total I spent about $190 AUD on components and say $25 AUD in shipping, so for a grand total of $215 AUD I'm extremely happy with my amp now. For Reference, the parts (inc prices) I used are below: XCAN V3 6 * 39000uf 35v Panasonic FC (18mm diameter) ($1.50 ea) - Bypassed with 6 * WIMA mks4 100v 1.0uf ($0.78 ea) 2 * 2200uf 35v Panasonic FC (18mm diameter) ($0.88 ea) - Bypassed with 2 * WIMA mks2 100v 0.22uf ($0.83 ea) 2 * 2200uf 35v Panasonic FC (16mm diameter) - ($3.20 ea) - Bypassed with 2 * WIMA mks2 100v 0.22uf ($0.83 ea) 2 * 100uf 35v Panasonic FC (XXmm diameter) 7 * Super Fast SF37 3A diodes 600v ($0.60 ea) 2 * WIMA mks4 100v 1.0uf ($0.78 ea) 2 * Nichicon ES 1000uF 16vdc ($1.60 ea) 4 * Nichicon ES 10uF 16vdc ($0.25 ea) 1 * MRA12 10 ohm ($4.40 ea) 2 * ceramic gold plated sockets ($4.00 ea) 2 * RU-6H23-EB Tubes ($42.00 ea) Power Supply 1 * multicomp box-diecast-ip65-222x146x55mm - ($9.40 ea) 1 * multicomp inlet-iec-dpst-with-fuse-holder ($13.92 ea) 1 * 0.47uf Mundorf Mcap Suprteme 425VAC ($15.00 ea) 1 * 80VA 2 * 12v torodial transformer ($41.00 ea) LUMBERG PLUG, DIN, STRAIGHT, 3WAY - ($10.60 ea) AMPHENOL SOCKET, XLR, PANEL ($10.90 ea) In conclusion, I must thank RockGrotto and Mike for all the reference material, and site content. Mike, Thank you so much!! You are a gentleman and scholar  Show us the underbonnet pRON! Glad it all worked out for you, remember it will all take a good 100 hours for the caps to form..... it should get better and better over the next few weeks. All the best, Mike. |
|
|
|
Post by PinkFloyd on Oct 15, 2013 21:33:53 GMT
The two x 10uF input caps are NOT required..... you can safely remove them and jumper over the pads with a wire link..... this will bring about and even "MORE" open window to the SQ. Pics of your work would be appreciated.
All the best,
Mike.
|
|
|
|
Post by PinkFloyd on Oct 15, 2013 21:40:50 GMT
Should be 4 x 100uF /35V (not two).... apart from that your BOM looks spot on.
ATB
Mike.
|
|
|
|
Post by smokeycigar on Oct 16, 2013 5:48:32 GMT
The two x 10uF input caps are NOT required..... you can safely remove them and jumper over the pads with a wire link..... this will bring about and even "MORE" open window to the SQ. Pics of your work would be appreciated. All the best, Mike. I though these were required "just in case" of DC. |
|
|
|
Post by smokeycigar on Oct 16, 2013 5:49:25 GMT
Should be 4 x 100uF /35V (not two).... apart from that your BOM looks spot on. ATB Mike. You are right, I have updated the initial post. |
|
|
|
Post by smokeycigar on Oct 16, 2013 5:53:07 GMT
Show us the underbonnet pRON! Glad it all worked out for you, remember it will all take a good 100 hours for the caps to form..... it should get better and better over the next few weeks. All the best, Mike. I would love to, but last time I tried uploading pictures there was an e ![]() rror message "Error: This forum has exceeded its attachment space limit. Your file cannot be uploaded. |
|
Deleted
Deleted Member
Posts: 0
|
Post by Deleted on Oct 16, 2013 6:18:20 GMT
smokeycigar
The picture upload facility was originally restricted to staff use, and this warning started after a Proboards Forum upgrade.
You will need to use something like Imageshack or Photobucket to post photos etc. I use Imageshack, which is free.
Alex
|
|
mrarroyo
Been here a while!  Our man in Miami!
Posts: 1,003
|
Post by mrarroyo on Oct 16, 2013 9:55:42 GMT
I get the same message Alex.
|
|
Deleted
Deleted Member
Posts: 0
|
Post by Deleted on Oct 16, 2013 10:06:14 GMT
Hi Miguel
Everybody gets the same message, which is why Admin have to use something like Imageshack or Photobucket too.
Regards
Alex
|
|